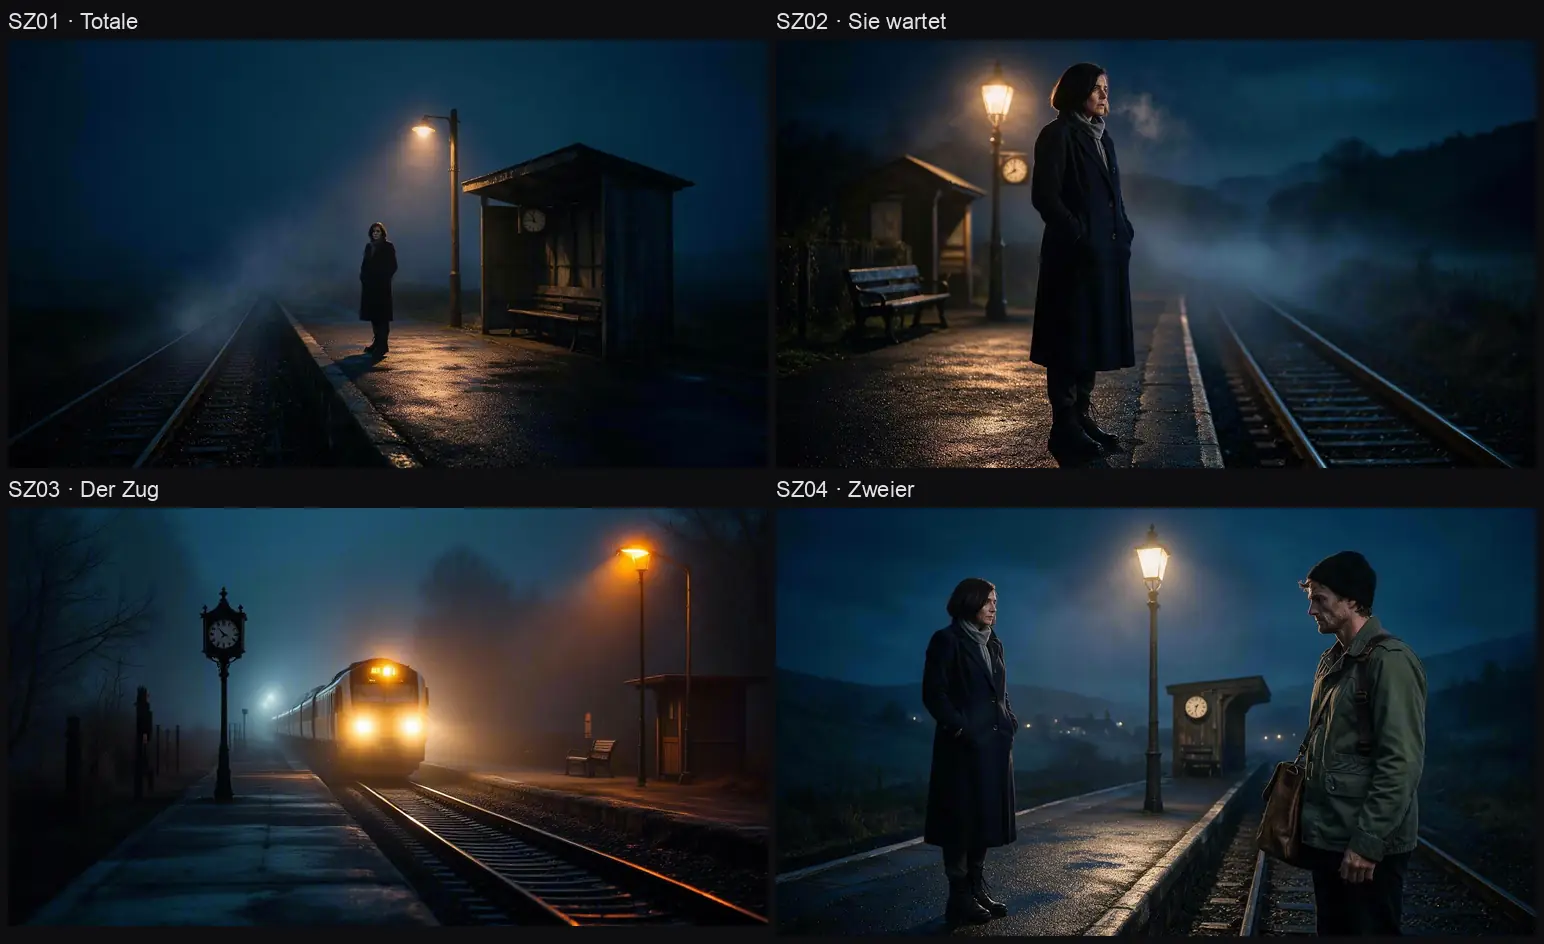
Step by step: from the empty project to the exported film — in the browser, with IRO, through AI agents and from within Resolve, Blender, After Effects, Final Cut or Avid. Every button is named here as it is named in the app, and before every step that costs money, it says what.
As of 2026-10-04 · labels from the app · prices queried live · measurements at /befunde
Open lab.thefilmradar.com/composer. Without signing in, the app sends you to the FilmRadar sign-in page and back afterwards — one account works for all FilmRadar products.
After signing in, your balance is shown at the top right: N/M Credits. A click on it opens the plan window.
Without a subscription you are on the Free plan (“No subscription · to try out”): 50 Credits a month to try things out (enough for a few images or a short clip), plus the full planning of a project: idea, screenplay, analysis, storyboard, shot list. For more you need a subscription or a Credit pack, see Pricing.
The cost line — the most important sentence in the app#
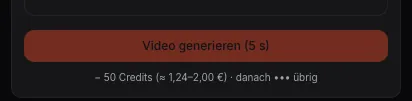
Under every button that costs money there is a line before you click:
The cost line in step 8. Price, euro range, remainder afterwards — made unrecognizable here.
The first number is the price in Credits, the figure in parentheses the euro range (what a Credit costs depends on how you buy — 2.5 to 4.0 cents), the last number your remainder afterwards. If it says up to N Credits, the price is a ceiling (for video, for example, where the delivered length counts).
· running low · Upgrade plan → — the run still works, but the next one may not.
Costs N — only M left. — the balance is not enough; the button is off.
via your fal key · no Credits — the run goes through your own provider key, see below.
What costs nothing says so too: free, free of charge or free · deterministic (no AI). Edit, render, export, grade, tracking and masks run on our machines and cost no Credits.
The cost line is the binding figure. Buttons with a cost line below them no longer carry a price themselves — one figure is enough.
Credits back if nothing is produced. If a paid run aborts at the provider — content filter, time limit, outage — the Credits are returned to your balance. What you see then is an error message with a reason, not a quieter result.
Anyone with an account of their own at fal, Hedra, Replicate or OpenRouter can generate through it. That needs the plan Pro BYOK or Studio.
Click the balance at the top right → in the plan window open the Your own keys section.
Paste the provider's key, Save. Afterwards only the last four characters are shown; it is stored encrypted.
From now on the cost line says, for every run that goes through this provider: via your fal key · no Credits. The provider bills you directly.
No silent fallback. If your key is invalid, the provider account empty or throttled, you get an error — not a run on our bill. The key is only checked on the first run, not when saving.
Where it does not apply: synchronization (dub/lipsync) always runs through Credits, because its price is blended from several providers; models reachable only through kie.ai likewise.
Studio includes three seats, you included. Invited people work in your projects with their own account — one access per person, no shared passwords.
Open the plan window → section Team. If it says Invitations will be enabled shortly., your Studio is not yet enabled — please let us know.
Enter the email, choose the role: Edit (work and generate, on your balance) or View (read, change nothing, spend nothing).
Optionally set a monthly limit in Credits (empty = no limit), then invite.
After signing in, the invited person chooses in the project dialog under Workspace between their own projects and Studio <your email> · Edit. In Murnau the same projects open with the same role.
If all three seats are taken, it says All seats taken. The window shows additional seats (€29 a month, without Credits), but they cannot be booked yet — it says so. What a member triggers is deducted from the Studio balance and carries their name; returned Credits go back to the balance they were charged to.
Idea or screenplay in → create characters and locations → per scene prompt, image, clip → arrange in the Sequencer → fine-cut in Murnau → export, with a provenance record.
There are two modes for this, switchable at the top of the bar:
Express
Idea in, animatic out. You give a story in a few sentences or a whole screenplay, and the pipeline runs through to a rough animatic. Default on first opening. Good for seeing in twenty minutes whether a story holds.
Workshop
Step by step. The ten steps of the left bar one by one, each with its tools. This is the way for everything that is meant to become pitch-ready — and the way this manual describes.
Posture and blocking of the figure before the prompt
no
Crew
Choose a preset (film or trend), override departments individually
no
Capture
Own material and photo to 3D
3D yes
Dub/Lipsync
Foreign-language track, clone voice, dubbing
yes
Murnau
Handover to the edit bay
no
If you know the screening: there the ten stages are called Idea · Screenplay · Location · Crew · Cast · Prompt · Image+VFX · Video+Sound · Sequencer · Export. The bar sorts this differently — Crew is a tool, Keyframe a step of its own. The same way is meant.
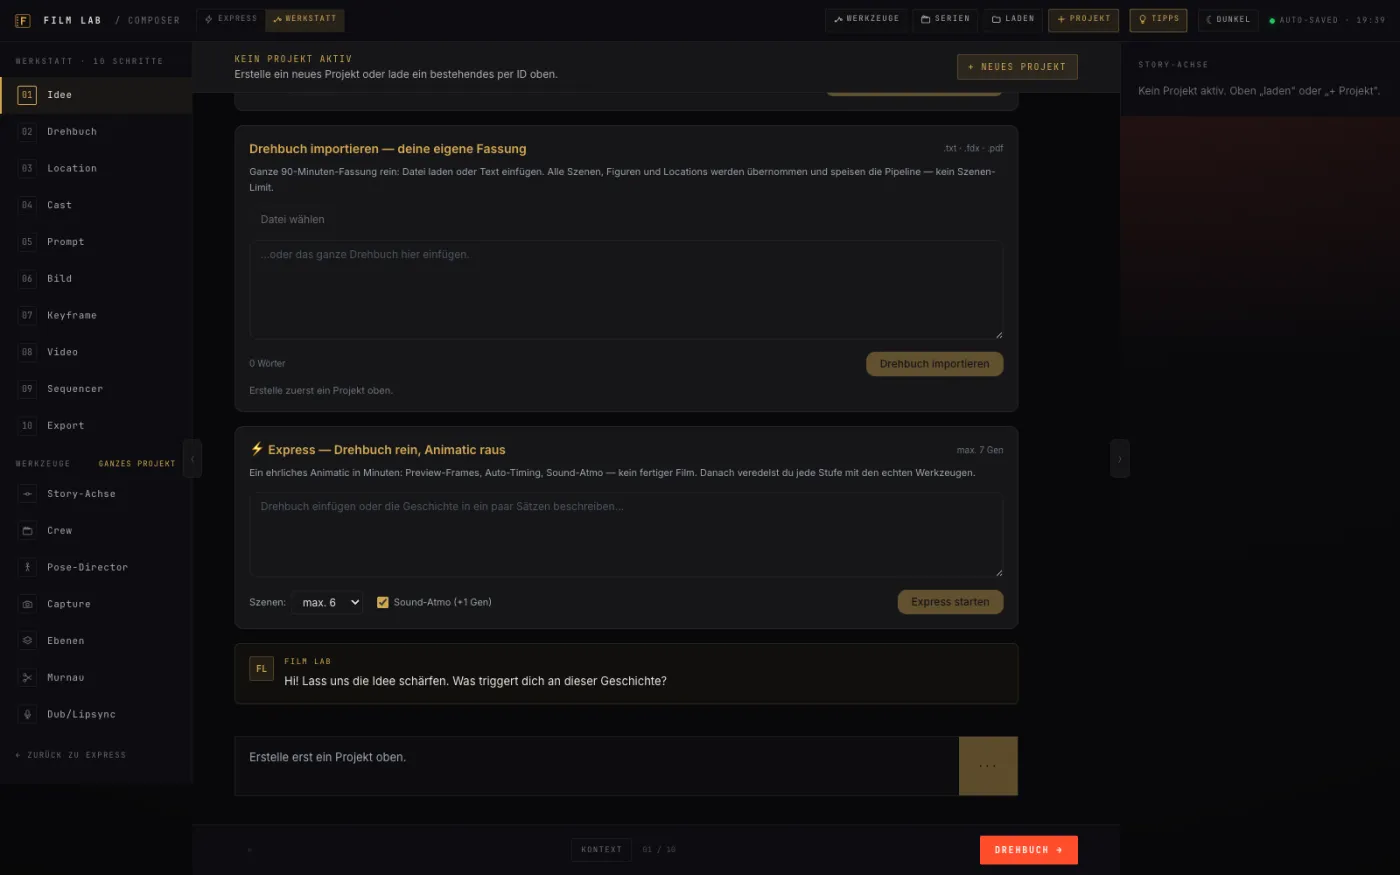
The workshop. On the left the bar with steps and tools, in the middle the open step, on the right IRO.
Every step follows the same pattern: what you need, what you do, what you have afterwards, what it costs. The labels appear here as they appear in the app.
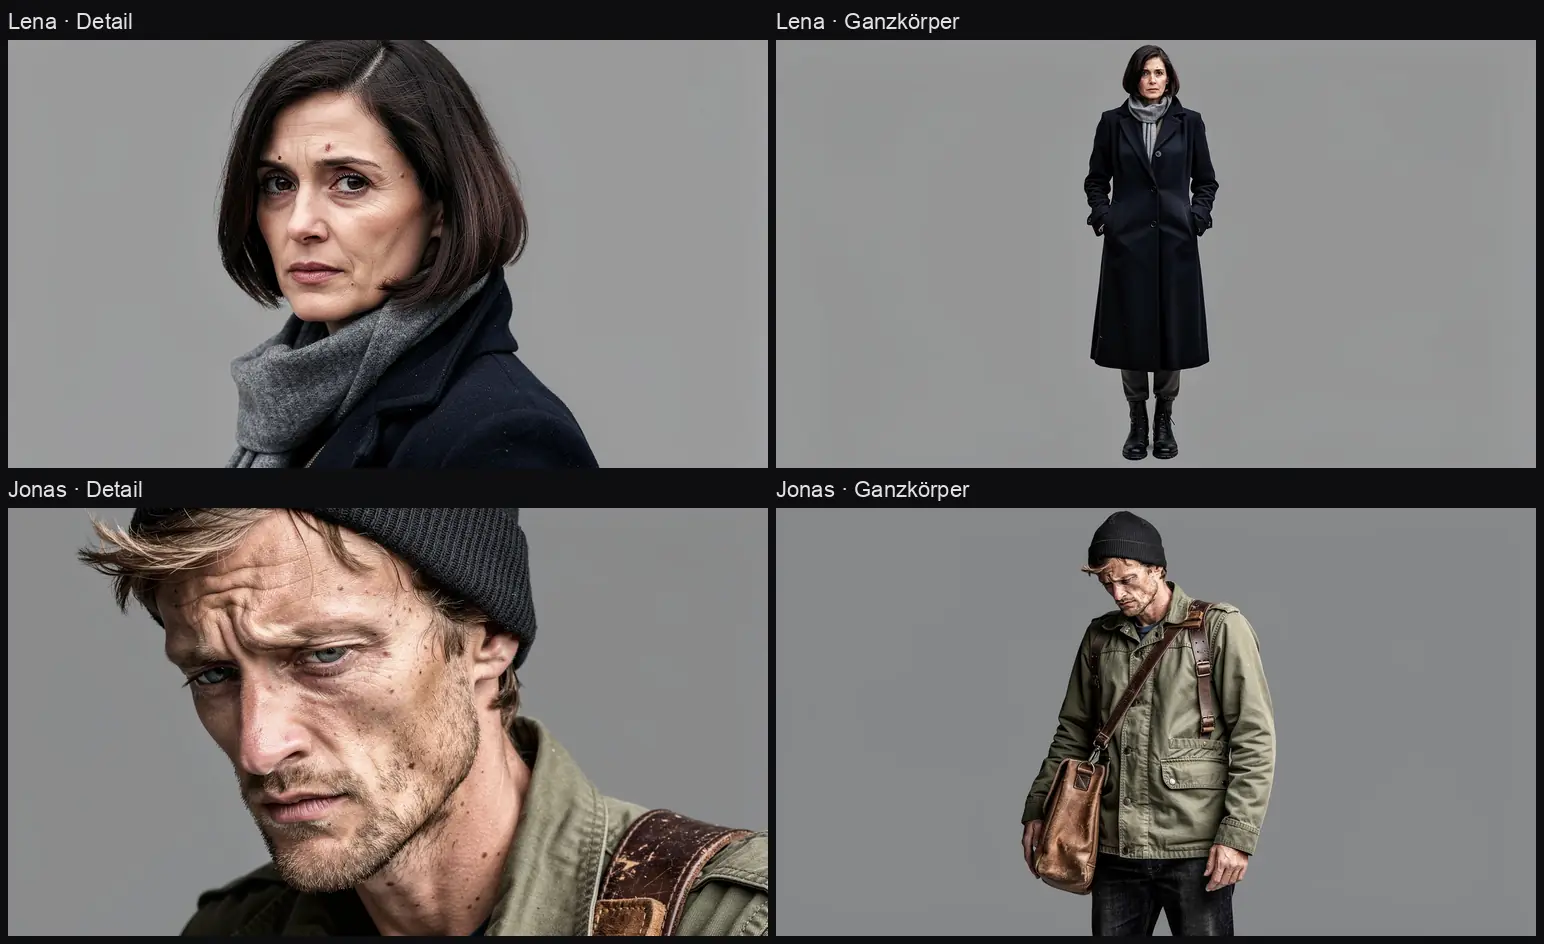
The images in this chapter come from an example we built through all the steps: “The Last Train” — a platform at night, Lena waits, Jonas gets off. Four shots, two characters, one location, 20 seconds. The same film was made with three video models; the comparison is in step 8.
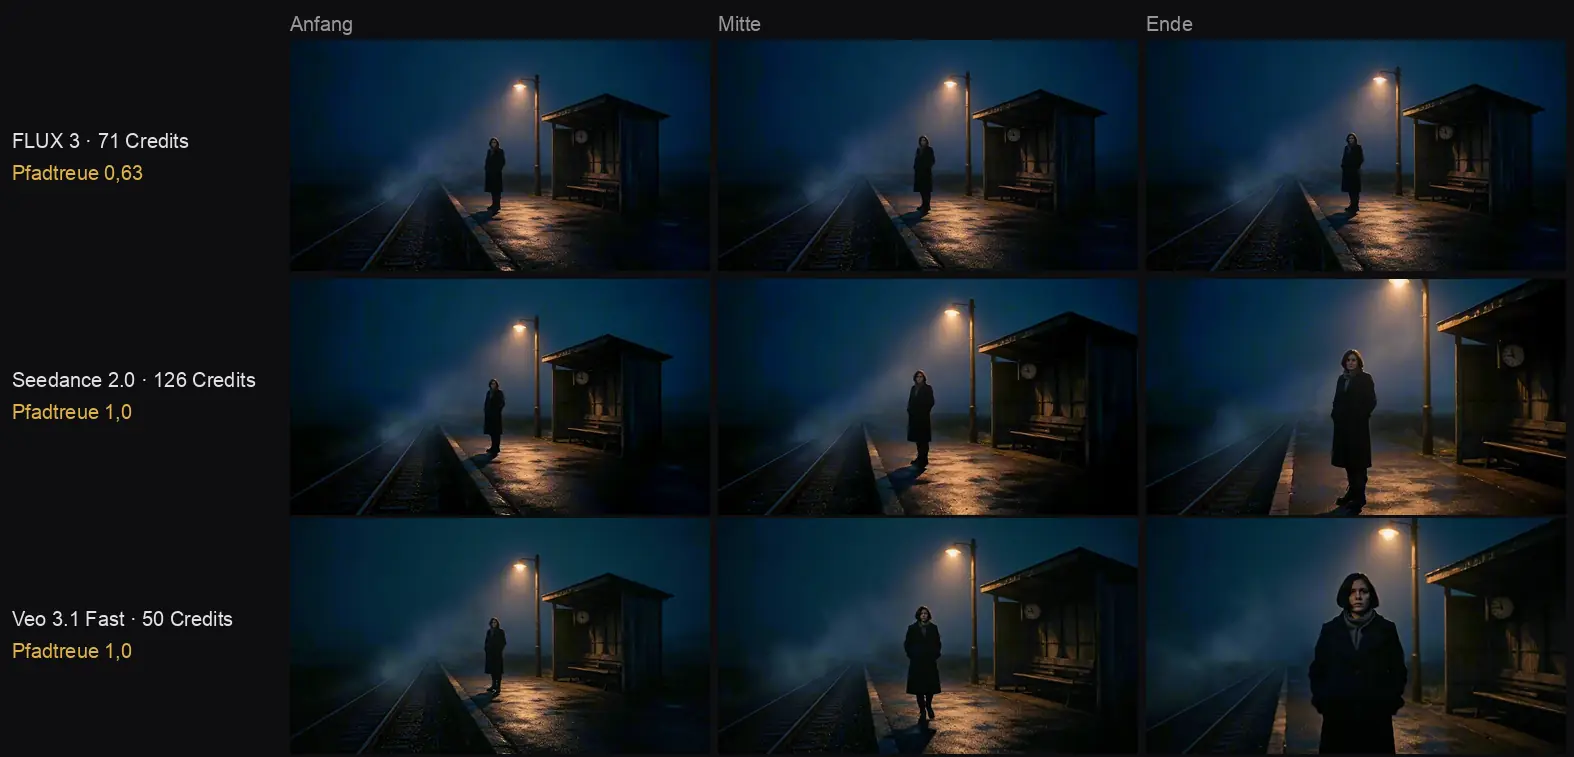
The Last Train, three times. FLUX 3 on the left, Seedance 2.0 in the middle, Veo 3.1 Fast on the right — the same start images, the same ambience, with sound.
A story in a few sentences — or a screenplay as a file or text. Credits for the images.
What you have afterwards
A project with a screenplay, scenes, one image per scene, and a rough animatic in the Sequencer.
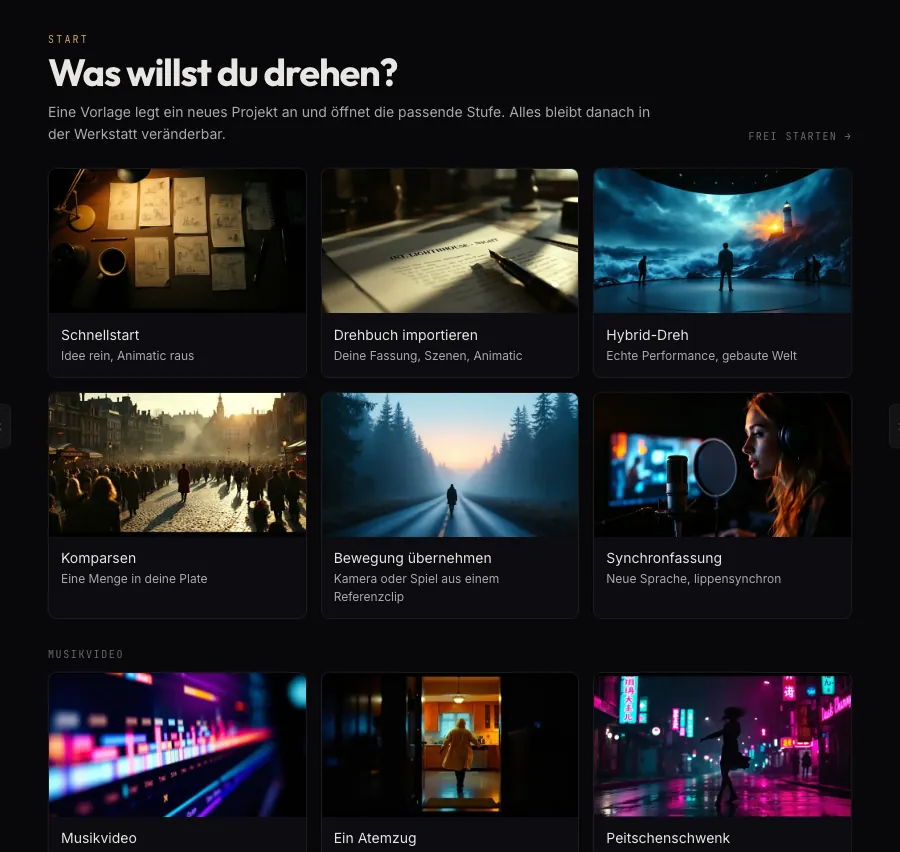
Templates. Each creates a project and opens the matching stage.
When you first open the Composer it says ⚡ Idea in, animatic out. Write into the field Paste a screenplay or describe the story in a few sentences….
Scenes: choose how many scenes the draft should get. Optionally tick Sound ambience (+17 Credits): an ambience bed under the animatic.
Read the cost line, then Start Express. The pipeline runs through; you see per stage where it stands.
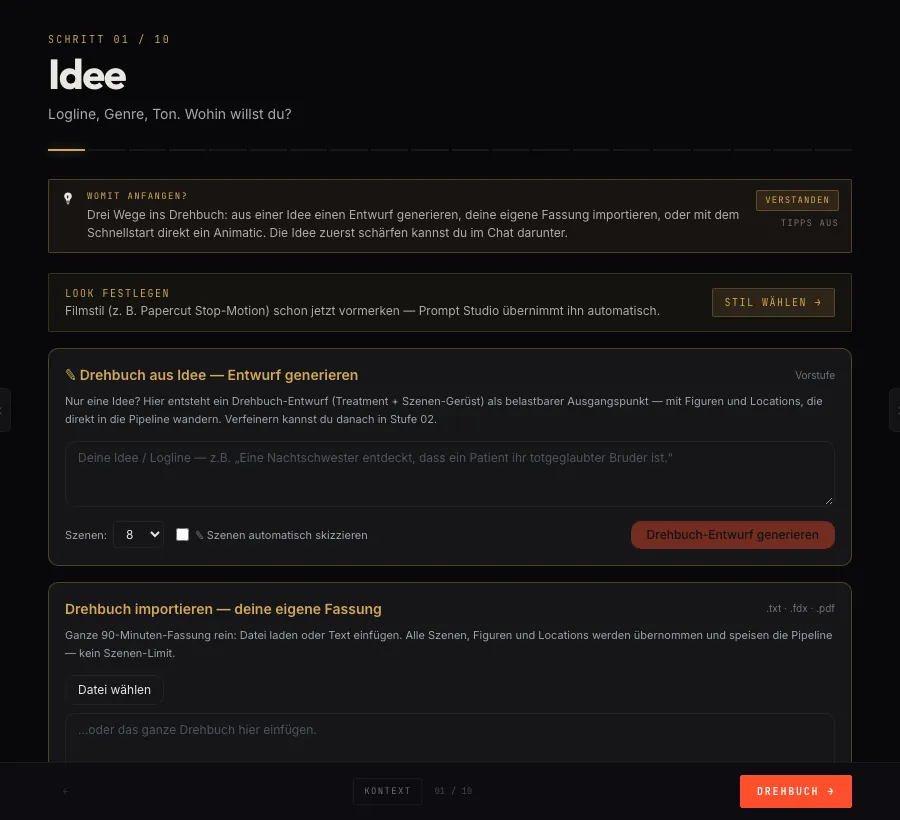
If you already have a screenplay: … or import a whole screenplay → Choose file (.txt · .fdx · .pdf) or paste the text into the field …or paste the whole screenplay here. → Import screenplay. Scenes, characters and locations are read from it.
From here, continue in the workshop: Prefer step by step? → Open workshop. Everything Express created sits there in the steps.
Price before the start in the cost line · one image per scene
A screenplay in the project — from step 1, from the import or from Script Studio.
What you have afterwards
Scenes with characters and locations as anchors for all further steps; on request a finished storyboard.
Step 2. Analysis chat and bridge, which reads characters and locations from the text.
Apply bridge reads characters and locations from the text and creates them as entries for Cast and Location. Once per screenplay; once more after larger rewrites.
In the chat below (Describe your scenes, dialogues, or ask for an analysis... → Send) the direction instance of your crew answers: scene analysis, suggestions, questions to the story. This is the place for “what is the second half missing?”.
✎ Work in solutions takes suggestions from the analysis into the text.
Auto storyboard creates a storyboard panel for every scene; the price is shown in the cost line below.
Next: Location →.
Analysis chat low · auto storyboard: 1 Credit per panel
The locations from the screenplay (step 2) — or your own photos of a real location.
What you have afterwards
One board per location with images, look and times of day, which serves as an anchor in prompt, image and video.
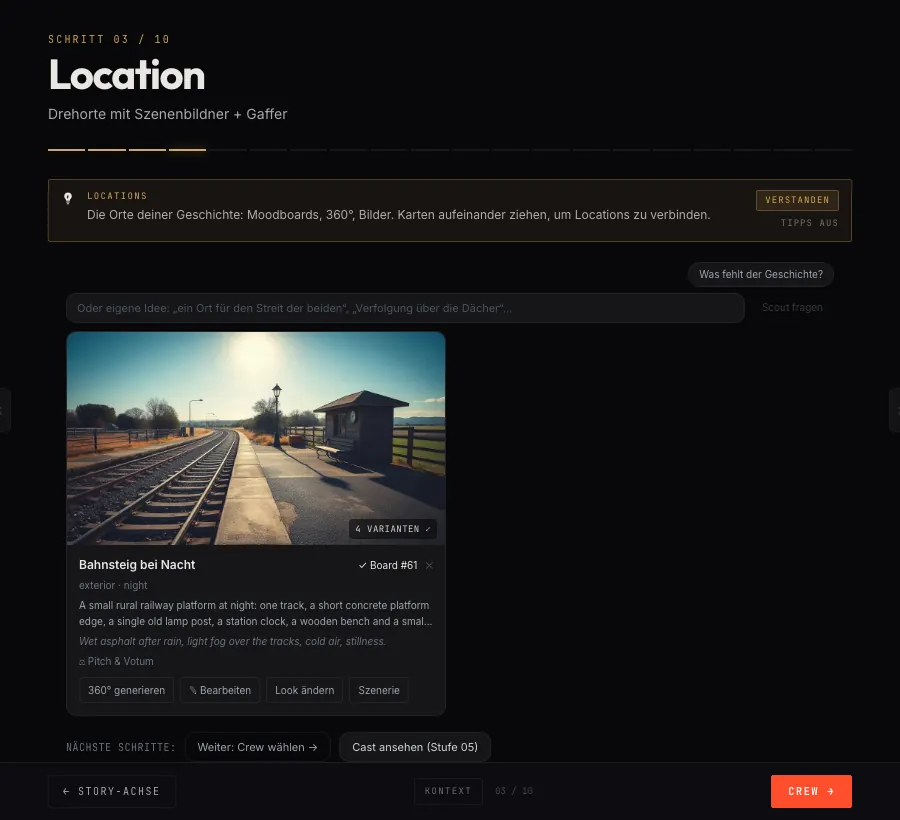
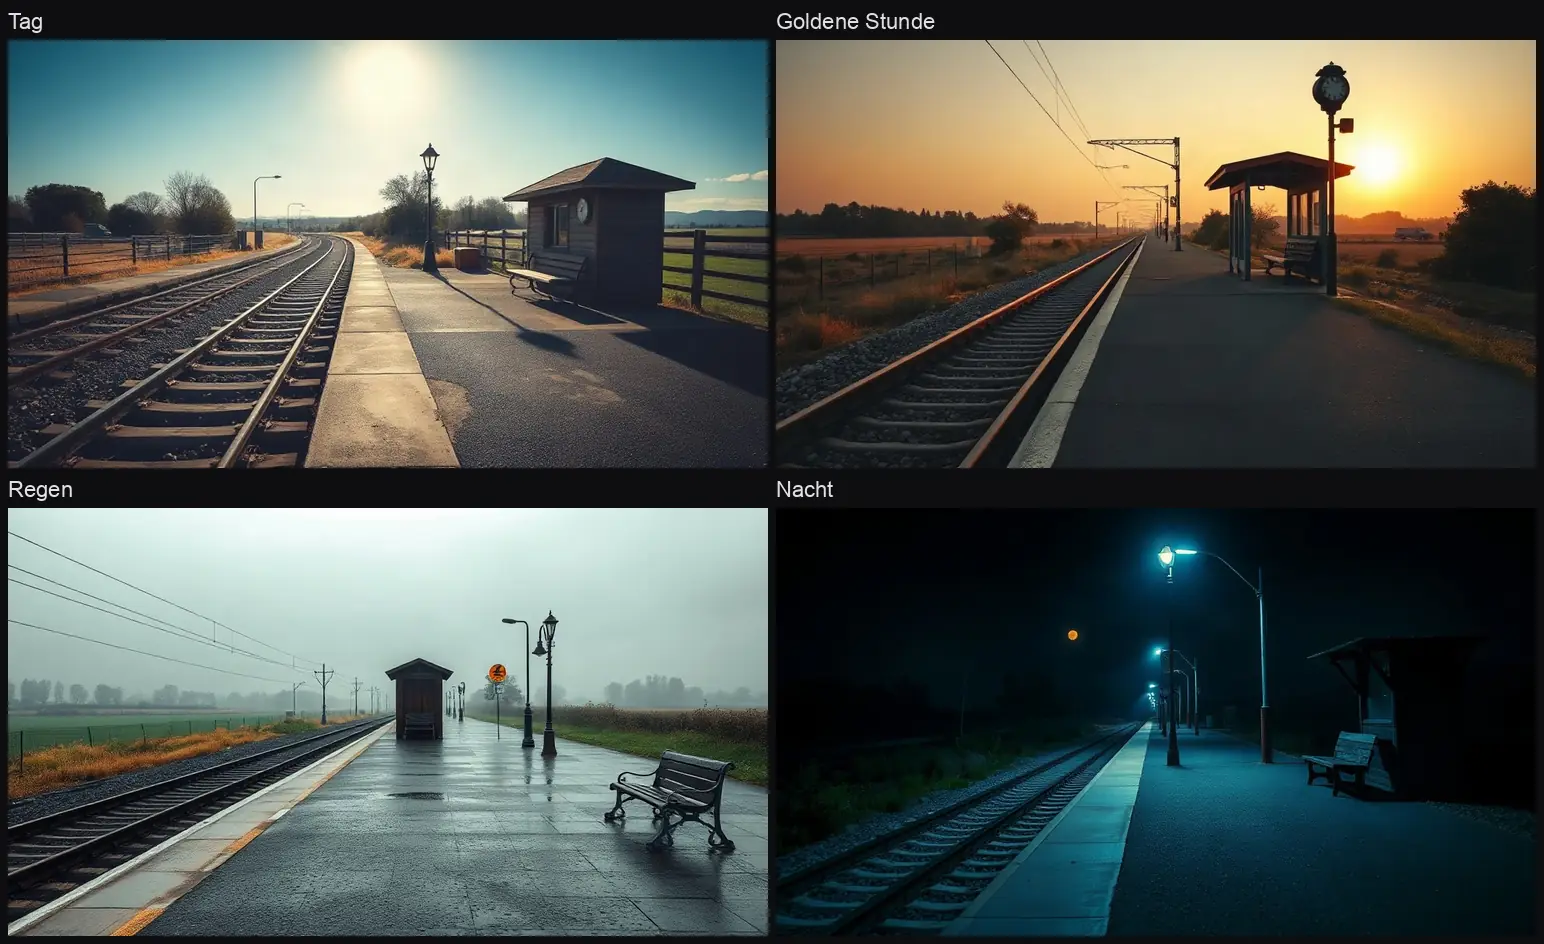
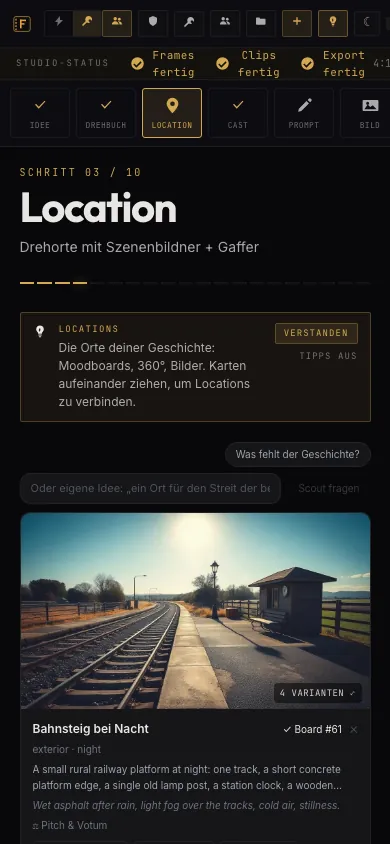
The board in the example. One board per location; “4 variants” opens all the images.Four times of day, one location. So that the variants differ, the location text contains no time of day — on the first attempt it said “at night” there, and all four images turned into night.On the phone. The steps appear as a bar at the top.
Extract from screenplay lists the locations from the text. What is the story missing? lets the location scout name gaps; Ask scout puts a question of your own. Answer suggestions with + Apply or Discard.
Per location → Create board. On the board: Generate moodboard (4 times of day) creates four images of the same location (morning to night).
Change the look: Rewrite look (text), then Moodboard in the new look (4 images); if you like it, Apply changes to the cards and Save.
Optional: Generate 360° and Enter 360° (a panorama to look around), ⚖ Pitch & vote (the crew rates two locations against each other), Connect… (use a board from another project here).
View cast (stage 05) leads on — the button still shows the old numbering; it means step 4.
Moodboard: 4 images, price per model in the cost line · 360°: own price · scout questions: low
The characters from the screenplay. For an imprint: photos, and for real people a consent ID.
What you have afterwards
One character sheet per character (several views of the same person) — the reference every shot is measured against.
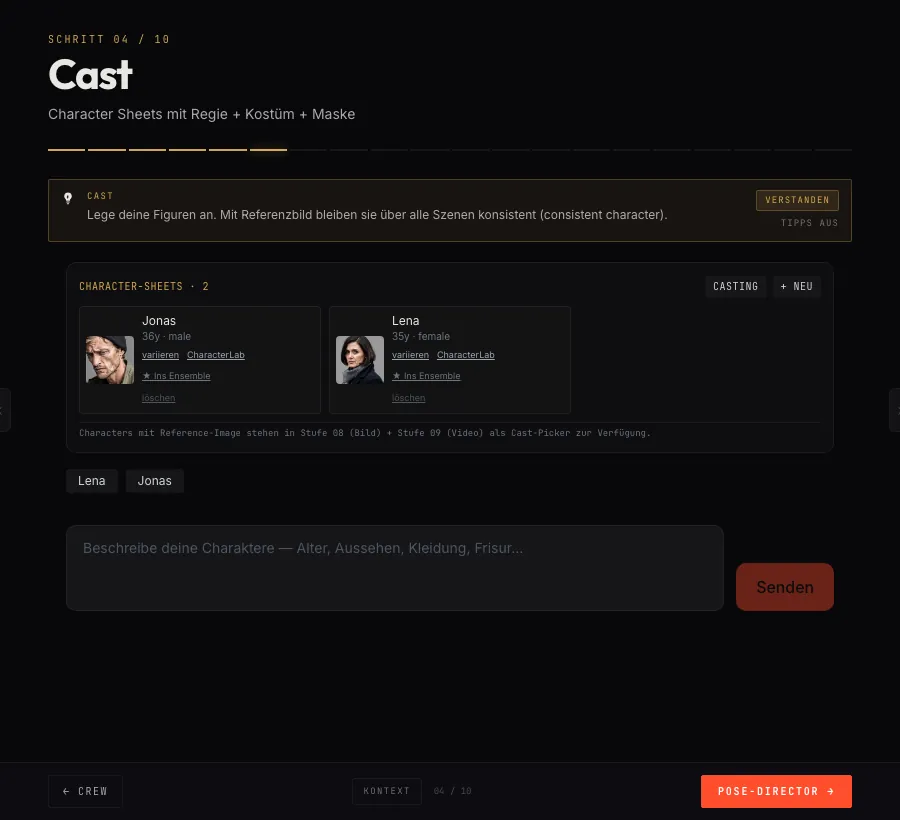
Step 4. One sheet per character.Lena and Jonas. Detail and full body on neutral gray — the sheet inherits no light.
Import characters from the screenplay creates an entry with a description for each character. A character of your own: + New.
The description (descriptor) is the text from which every image of the character is made. Put in features that should persist — eye color, nose shape, a mole, posture — and no year: it is removed on saving, because it makes content filters bite harder. Age goes in as anatomy (“first fine forehead lines”), not as a number.
Generate ref creates the portrait, CharacterLab the whole sheet: Close 3/4 (the anchor), Close frontal, Profile, Full body front and back and a costume plate without a person — the outfit on its own, so that a small face in the full-body view does not run along as a second identity. Poses (sitting, walking, action) come as extras, not as reference. The further views are derived from the detail view (back and costume from the full body), not individually from text — that keeps it the same person (measured 9 out of 10 instead of 0 out of 10, see Findings). If a view is missing from the answer, it says why (usually a content filter). The views stand on a plain gray field, shadowless and without a floor — so a sheet passes on no light to later scenes. The detail view is always a tight portrait, even if the description mentions “full figure” or shoes (Findings).
vary for alternatives, ★ Into the ensemble for the fixed cast, Casting to compare several candidates, Cast role to assign.
CharacterLab opens the workshop for a character: add views (Add views, Regenerate views) and the imprint — the trained identity that delivers the same person in every lighting situation. Test image checks it against an instruction of your own (“at the kitchen table, hard overhead light, medium shot”).
In the chat (Describe your characters — …) direction, costume and makeup of your crew answer questions about the character.
An imprint from photos of a real person only with a consent ID. The field Consent ID (LK-…) is a gate, not a checkbox: without an ID from the Likeness register nothing is uploaded (Without a consent ID (LK-…), nothing is uploaded.). If the consent is withdrawn, the path closes immediately.
The imprint costs immediately — “the run is paid even if nobody checks”, it says on the button. First sheet, then test image, then imprint.
Sheet: one image price per view (≈ 0.25 USD provider cost for a full sheet) · imprint: own price, shown on the button
A scene, plus cast and location from steps 3 and 4.
What you have afterwards
An image instruction that carries light, optics, camera and the references of your characters and locations — for step 6.
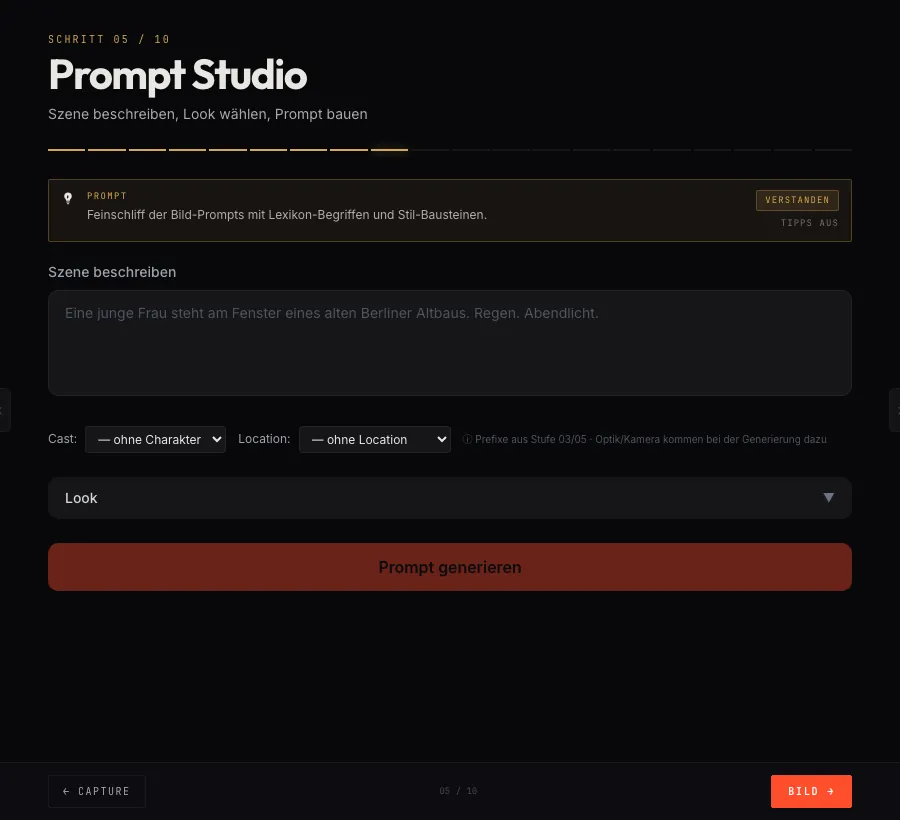
Prompt Studio, before. Scene, cast, location — Generate prompt builds the instruction from them.
Scene text into the field Describe scene; below it choose Cast: and Location:. The switch Look brings along the look of the crew configuration.
Generate prompt builds the master prompt from it — in English, with shot size, optics, camera, light and composition. It sits in the editor below and can be edited by hand there.
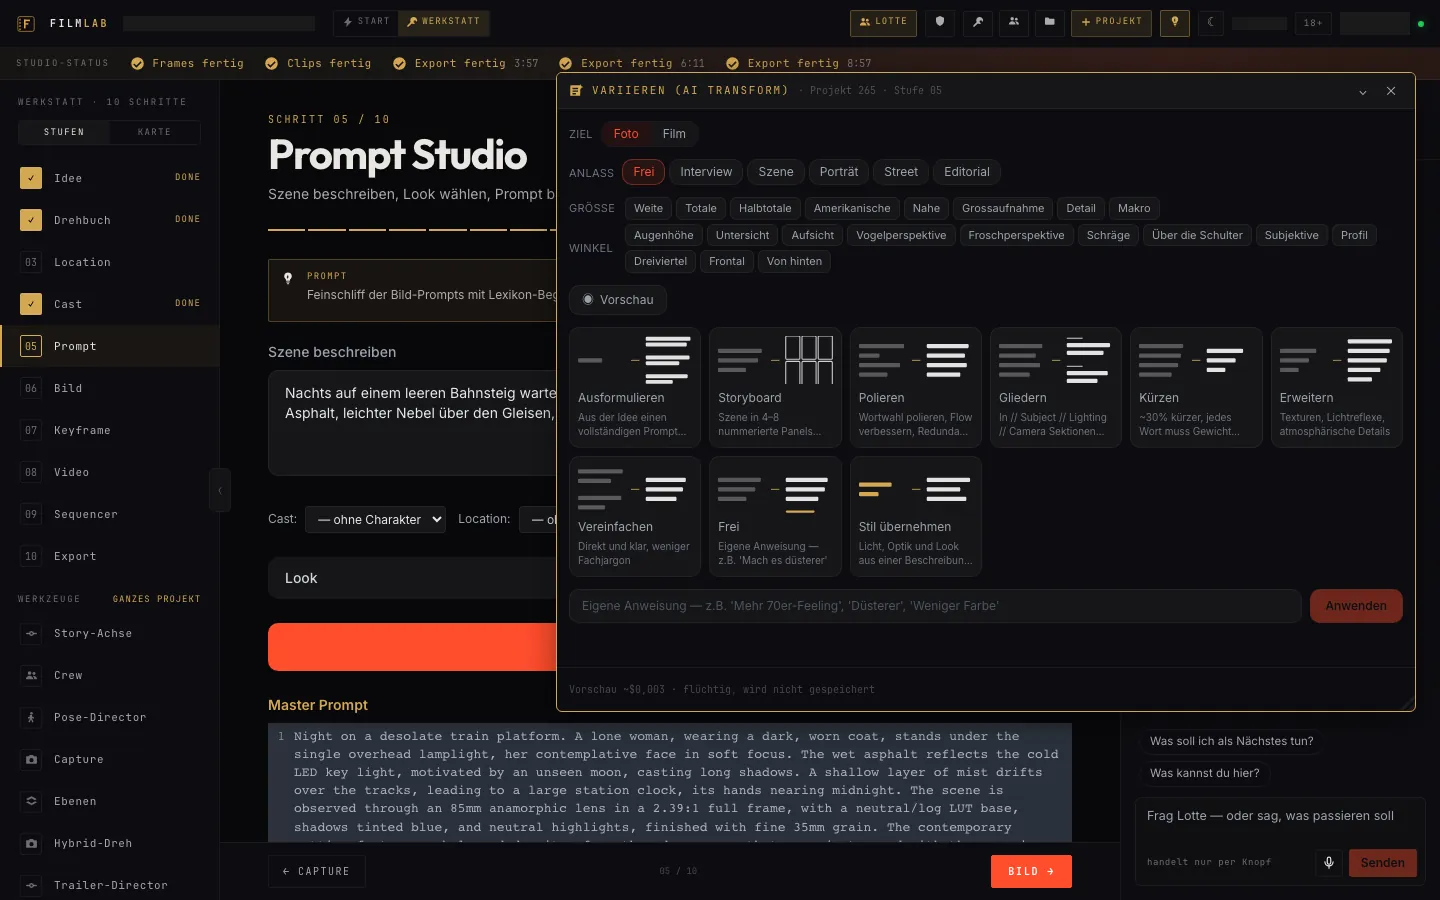
Tools on the result: Vary (AI Transform) opens the console for rewriting — Word out, Storyboard (scene in 4–8 panels), Polish, Outline, Shorten, Expand, Simplify, Free (own instruction) and Take over style; at the top you choose target (photo/film), occasion, size and angle. Dreamer (prompt engine) proposes a breakdown (découpage). ▦ As 3×3 grid puts nine frames into one image, ⌗ Break down into shots splits the scene into shots.
Preview before it costs money:Preview in the transform console renders a tiny test image for the prompt (about a third of a cent). It is not stored; it only answers whether the prompt holds up.
After generating. At the bottom the master prompt for the example, above it the console Vary (AI Transform) with all its tools.
Blocking instead of description. Where a figure stands in the frame is not described, it is placed: Open Blocking Board (in step 8 and in the Pose Director tool) puts cast and props into the frame as boxes; the description with coordinates falls out as a by-product. Measured, this holds the arrangement markedly better than any sentence — and for camera moves the full move takes six generations instead of 360 (Findings).
A prompt from step 5 — or the shots from “Break down into shots”.
What you have afterwards
Selected stills per shot, with a look on request, as start images for keyframe and video.
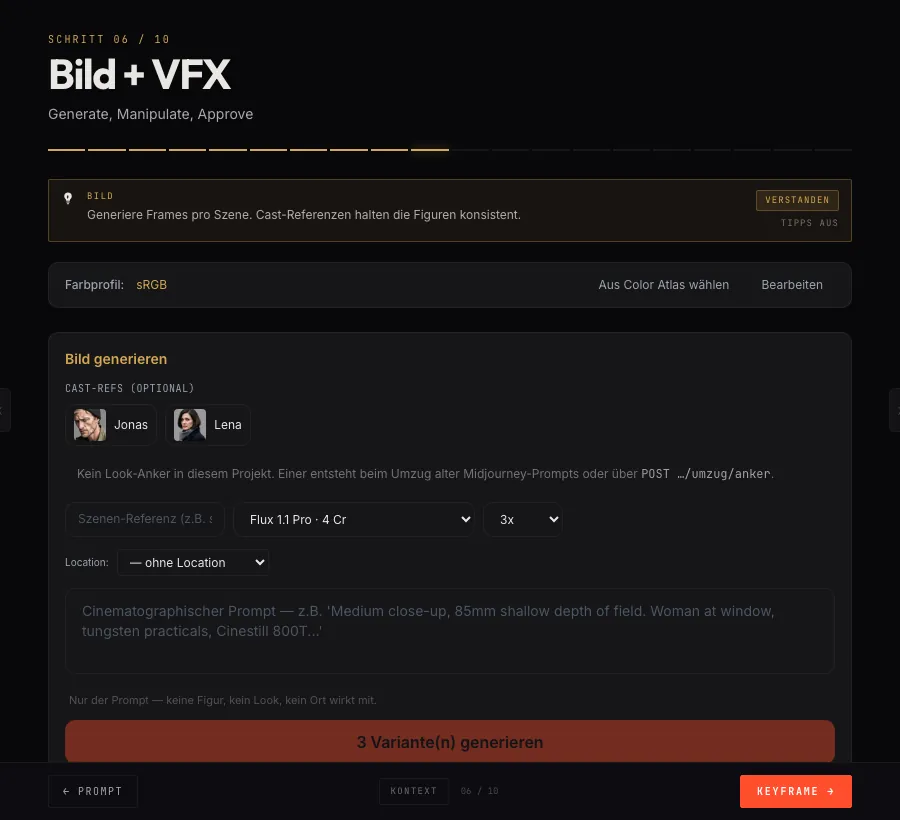
Step 6. Model, variants, cost line.Four shots. With a character reference you need a model that places the character into the scene (here Seedream 5.0 Pro) — Flux Redux took over the gray sheet background.
Load shot prompt fetches the prompt of a shot, ↙ Take over master prompt from stage 05 the whole one from step 5 (the number in the button is the old count).
Choose the model and the number of variants. The button reads Generate N variant(s); the cost line below names the price in Credits. For whole scenes: Illustrate N shots.
Compare images (⋈ Compare, ▦ Sheet = contact sheet), select the best with Select. Only selected images move on to the next steps. Del deletes.
Choose from Color Atlas sets a color world before generation.
Apply a look (grade):Ask IRO for a look → opens the grade companion. It suggests a look and shows before/after; Apply “<Look>” to this still applies it — non-destructively, the original stays, the graded image is a new row. The list holds 20 original looks and Reference looks from films (50), each with a still and details of film, year, director, camera (the list is under Findings).
Fine-tuning with sliders: in the panel VFX operations the tool Grade — Start from the colorist brief, Exposure (stops), Saturation, Hue (°), Brightness, Contrast (unchanged / high (S-curve) / flat), Film grain, Monochrome grain. Relight is there too: Light left/right/top, Golden hour, Blue night.
Image: 2 to 13 Credits on the reference surface depending on the model · Grade and look: free · deterministic (no AI)
Selected images from step 6 — or an image of your own by URL.
What you have afterwards
Refined keyframes, and on request the first clip from them right away.
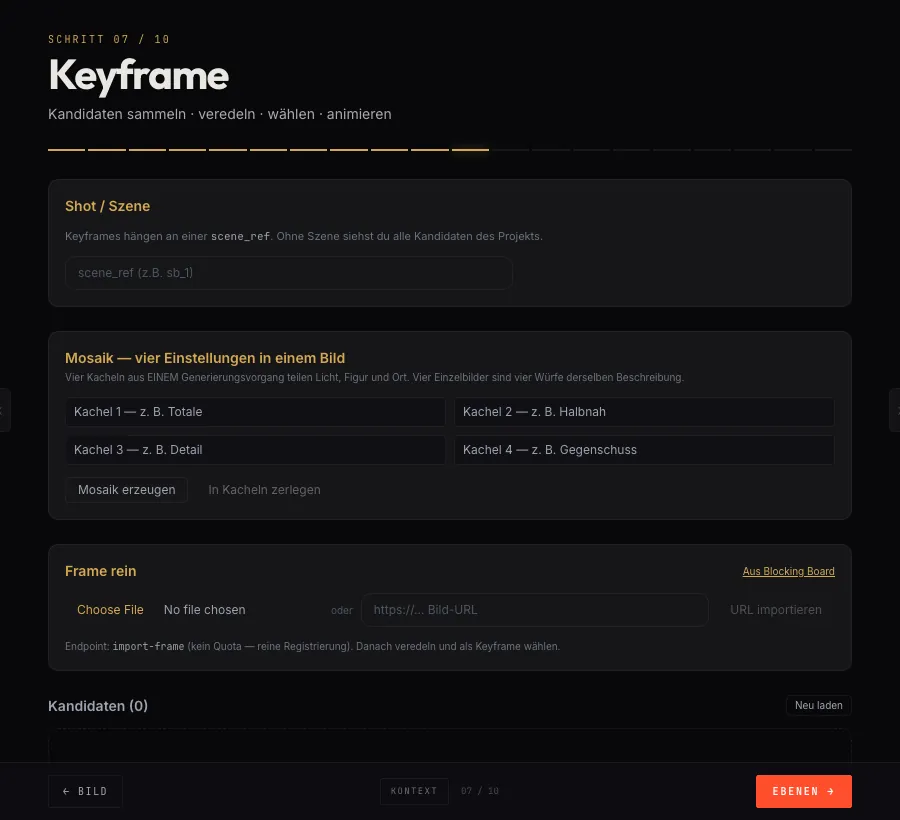
Step 7. Mosaic, import, refine.
Create mosaic combines several images into a mosaic (one run for several frames); Split into tiles brings the single images back out. Import URL takes in an image of your own.
Refine (i2i) recalculates an image at higher quality (image-to-image) — details, resolution, without losing the composition.
Animate this keyframe · N s starts a clip from this image directly. The duration is on the button, the price below it; it is the same way as in step 8, only from here.
Refine: image price · animate: video price by length, model, resolution
One selected start image per shot. For reference motion: a clip as the template.
What you have afterwards
Clips per shot, and the audio tracks that go with them — music, sound effects, ambience, dialogue.
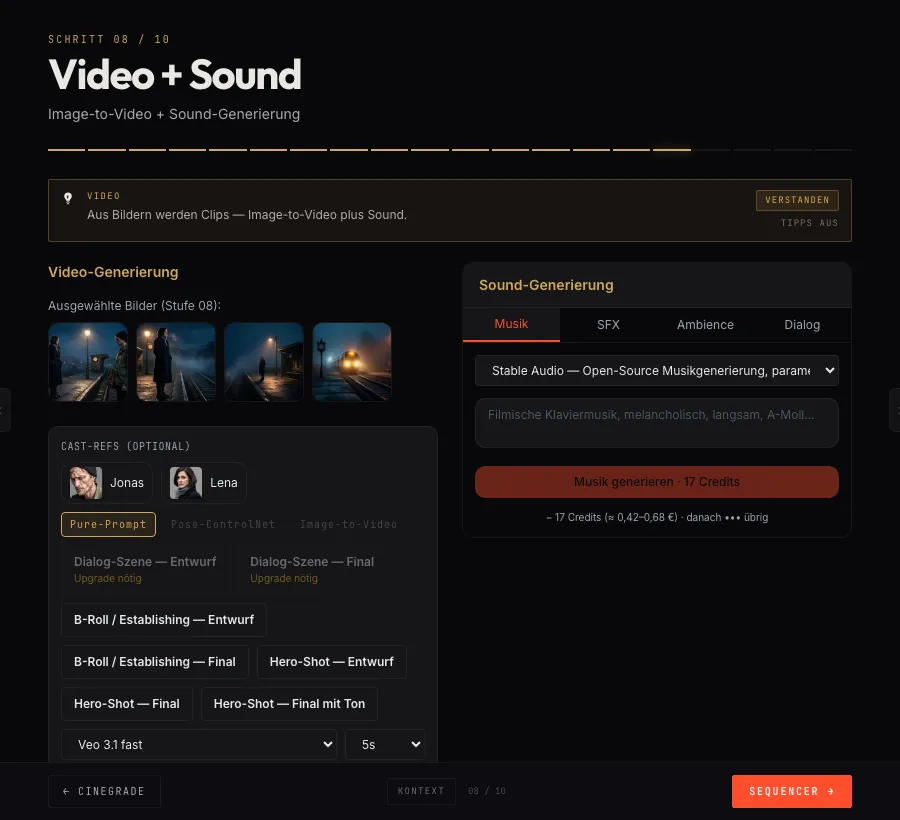
Step 8. Video on the left, sound on the right.Choose a model. The cost line under the button follows every choice — here 50 Credits for Veo 3.1 fast, 15 for Veo 3.1 Lite — before anything is charged.
The model is the most expensive decision in the whole pipeline. For the same ten-second shot there is a factor of six in price between two models, and the calmest is not the most expensive. That is why there is more text here than elsewhere.
Load shot prompt. Choose the model below it. Each model lists its input roles below it: whether it starts from text, requires a start image, accepts an end image, a video as template, delivers sound (always / on request / never). The end-image field appears only for models that take one. For four models there are example clips directly under the selection.
Choose duration and resolution. 720p instead of 1080p costs less than half and loses a measured 1.1 dB of frame steadiness — against a gap of 16 dB between the best and the weakest model. The choice of model decides, not the tier.
Read the cost line (up to N Credits — video is billed by delivered length), then Generate video (N s). If it says Upgrade plan →, the model needs the Pro plan (Veo 3.1 Standard, Kling 3 Pro, Seedance 2.5, HappyHorse, Wan VACE).
Open Blocking Board for shots where the arrangement matters (see step 5).
Generate reference motion (…): a clip as the template for movement and camera — reshoot from new angles, location as reference, take over style. Seedance 2.5 can also do this without a clip, with reference images only (location, prop, style). Rules for this in the box below.
Per clip: Select for the selection, Look for the grade on the clip, ⊞ Cues / Read from prompt creates the statements of the prompt as cues, which you later hold against the image in Murnau.
Seedance 2.5 accepts no faces — not as a start image, not as a reference image, not in the reference clip, not even for invented characters. The check is done by the provider, not by us: the run is booked, rejected and the Credits are returned to your balance. For shots with a character: build a still in step 6 and animate it with an image-to-video model that accepts faces (Seedance 2.0, FLUX 3 Video, Kling). For rooms, props, atmosphere Seedance 2.5 is the steadiest we have measured.
Veo 3.1 fast delivers eight seconds when ten are ordered — measured twice, the full length is billed.
Original sound stays only if you say so. Models that generate sound along with the picture replace the speaker's voice with a synthetic one — even if the prompt forbids it. With reference motion using a clip and without “Generate sound”, FilmLab puts the template's sound back automatically (ton: quelle); measured drift 0.044 s. For a close-up while speaking that is enough, for lips in a tight close-up not always — listen closely.
Three models, one wide shot. FLUX 3 barely moves (path fidelity 0.63), Seedance 2.0 moves in cleanly, Veo 3.1 Fast too — but Lena starts walking. Path fidelity measures the camera, not the figure: looking remains mandatory.
Specifying a camera move — what the models actually do
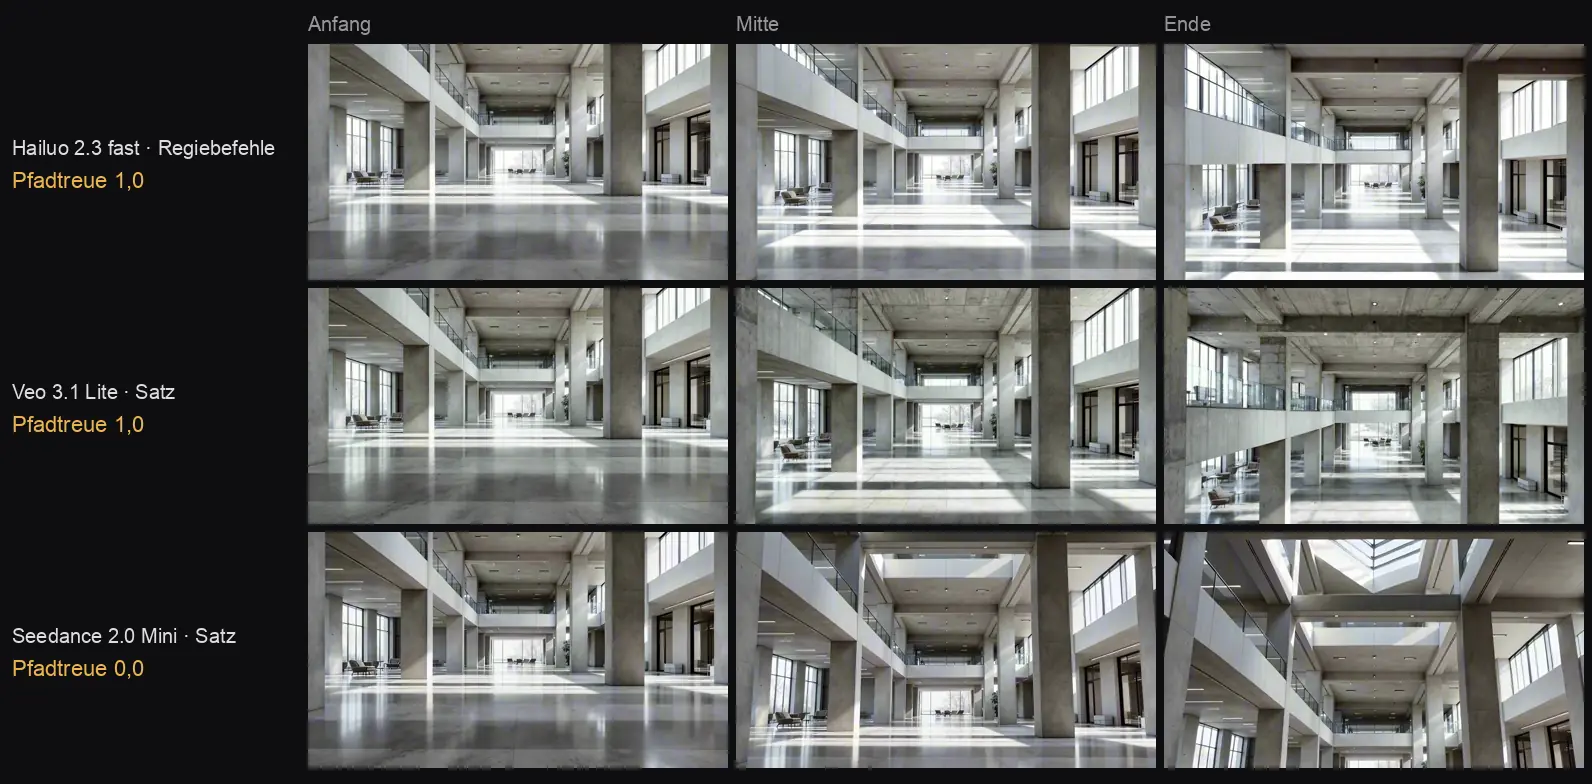
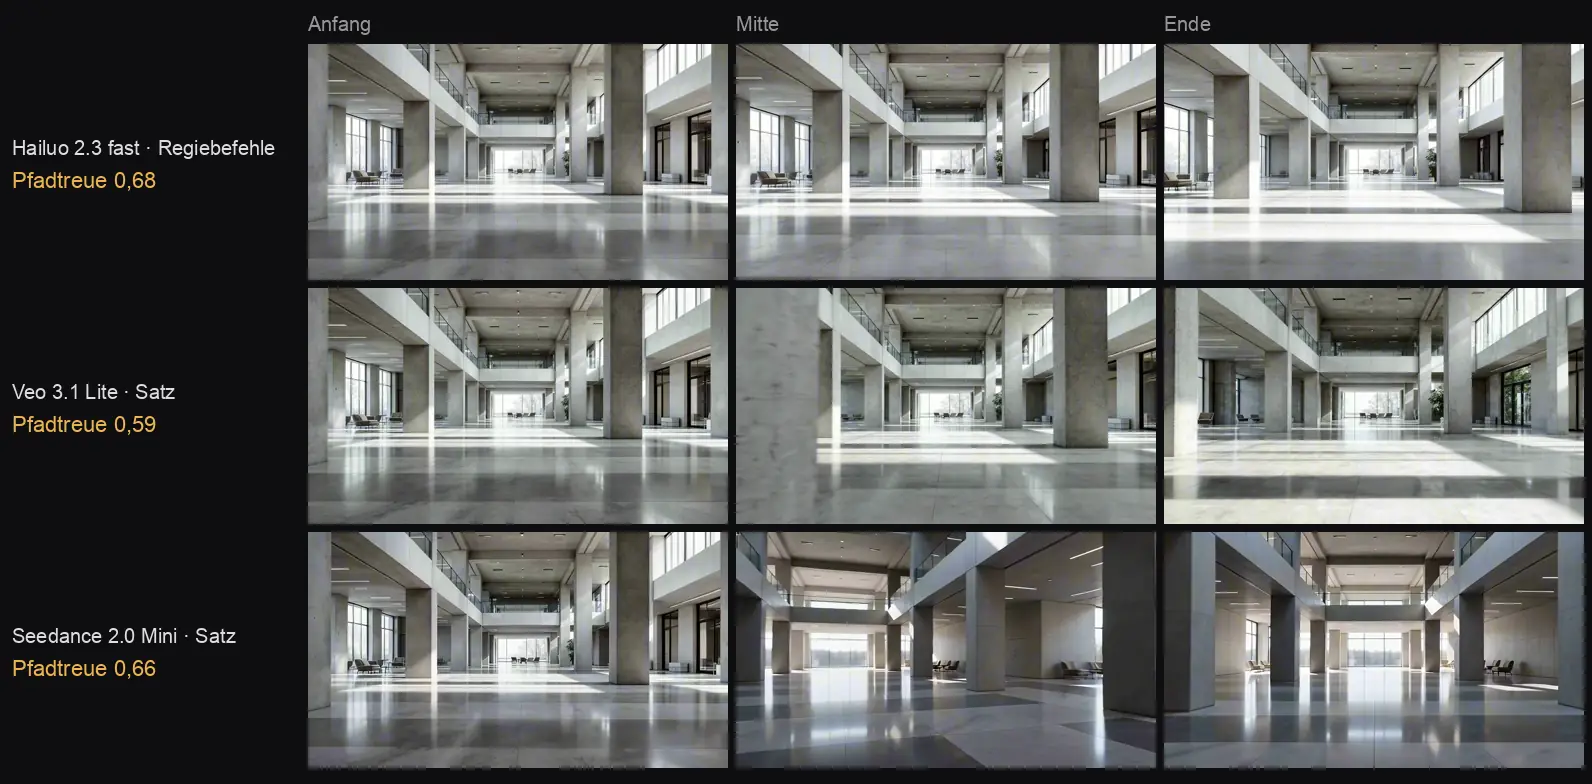
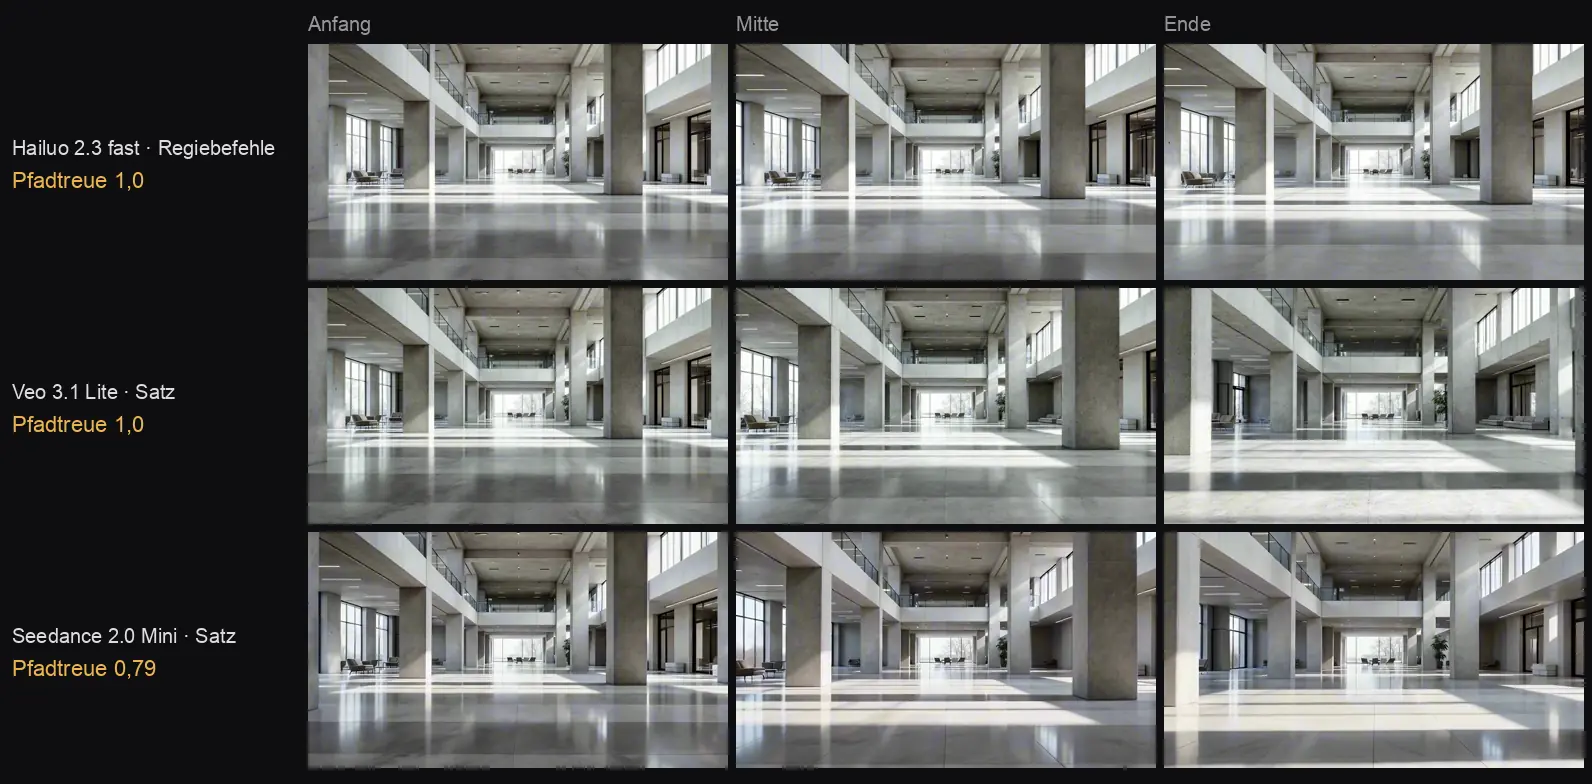
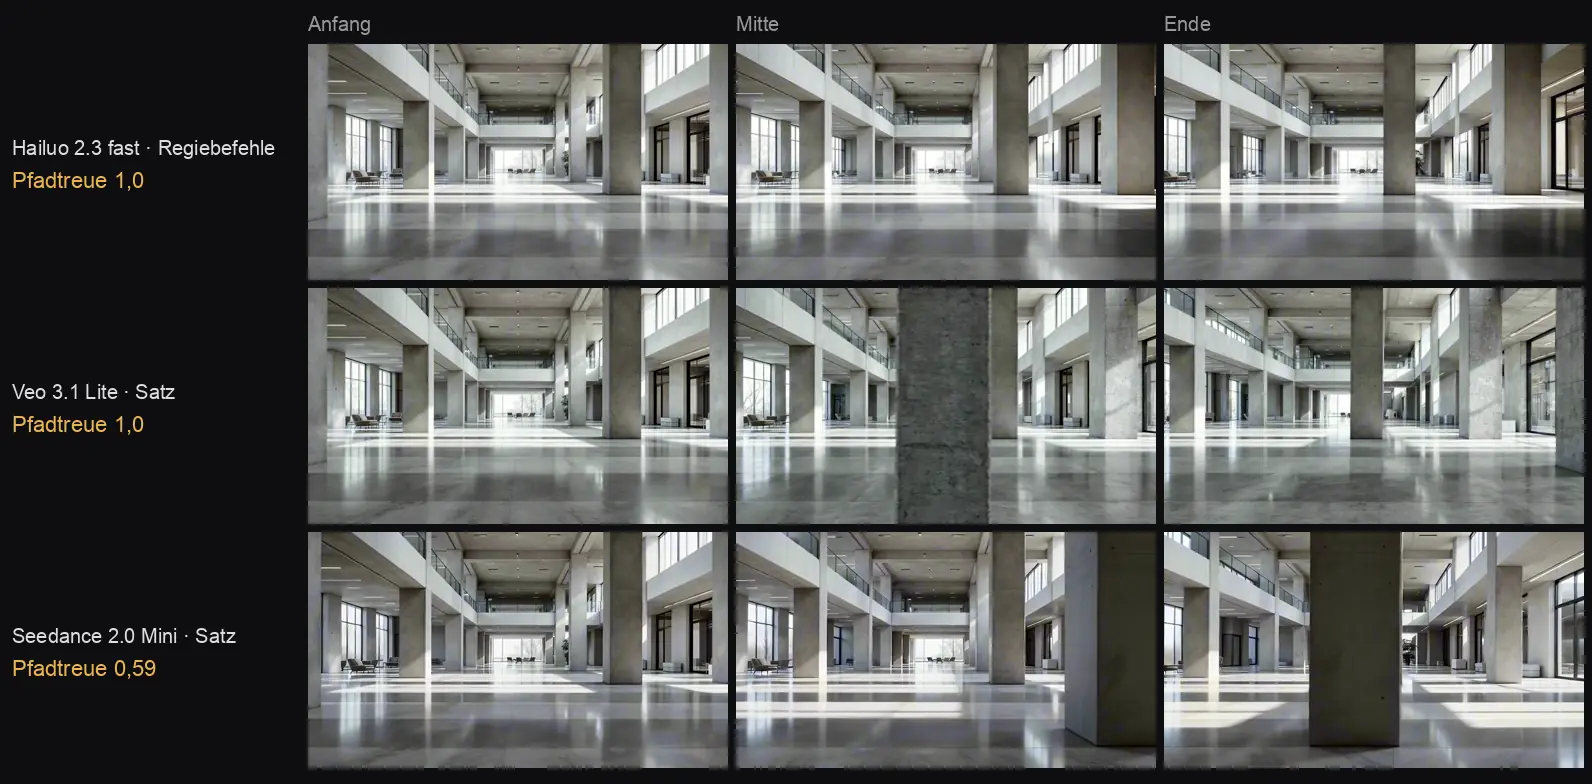
A camera move can be supplied as a path: from Kadrage, from the Blender add-on or through the MCP server (kamerapfad). No video model receives the poses themselves. FilmLab translates the path into the form the model understands: Hailuo gets director commands in the prompt ([Pan left] [Push in]), all the others get a sentence (“Slow dolly in toward the subject…”). After every run FilmLab measures how faithfully the movement in the clip follows the path (path fidelity, 0 to 1).
Calibration run of October 4, 2026: one start image (empty interior), four paths, one clip per model.
Path
Hailuo 2.3 fast Director commands
Veo 3.1 Lite Sentence
Seedance 2.0 Mini Sentence
Move in
1,0
1,0
0,79
Lateral move right
1,0
1,0
0,59
Crane up
1,0
1,0
0.0 — tilts instead of lifting
Pan left, then move in
0,68
0,59
0,66
It follows that:
One movement per shot is implemented reliably by Hailuo and Veo. Seedance 2.0 Mini confuses crane and tilt and does not hold the direction reliably.
Crane up. Hailuo and Veo lift the camera through the hall, Seedance 2.0 Mini stays low and tilts toward the ceiling.
No model carries out two movements in a row. Hailuo only moves in, Veo mostly too, Seedance pans almost the whole time. For multi-part moves split the shot or use reference motion.
Pan left, then move in. None of the three models does both parts in sequence.
Reference motion is the precise way. Seedance 2.0 with a template clip rendered in Blender drove the lateral move at 1.0 and deviated in the image by 0.27% of the width from the poses sent.
Reference motion. On the left the template from Blender, on the right Seedance 2.0 with this template — same move, different space.
Director commands versus sentence: between Hailuo (commands) and Veo (sentence) no difference was visible. A comparison within the same model is still outstanding.
Move in. Hailuo and Veo move steadily, Seedance 2.0 Mini stops briefly.Lateral move right. With Seedance a pillar runs through the foreground — path fidelity measures less reliably there.
One clip per cell is an indication, not statistics. The numbers apply to the cheaper tiers (Lite, fast, Mini) and one start image. Where a pillar runs through the foreground of the image or the camera looks at a flat wall, path fidelity measures less reliably: in front of a surface a tracking shot looks like a pan. Start images with depth in front of the camera measure most reliably.
Sound
On the right in the step is the panel Sound generation with four tabs:
Tab
Example instruction (placeholder in the field)
Tool
Credits
Music
“Cinematic piano music, melancholic, slow, A minor…”
Stable Audio 2.5, up to 190 s
17 per run
SFX
“Rain on a window pane, quiet footsteps on a wooden floor…”
ElevenLabs SFX v2, 0.5–22 s
1 per 3 s
Ambience
“Quiet Berlin old-building stairwell, a clock ticking…”
Stable Audio 2.5
17 per run
Dialogue
“Female voice, 30 years old, gentle: 'I am waiting here.'”
ElevenLabs TTS Multilingual v2
9 per 1,000 characters
Created several tracks? Pin the one you want with Select, otherwise the newest wins in the Sequencer. Anyone who later wants to cut the music to the beat writes the tempo into the instruction (“120 bpm, steady four-four time”) — that is the most effective lever on the whole route and costs nothing.
Video: by length, model, resolution — ceiling in the cost line · sound: see table
Selected clips from step 8, plus the audio tracks.
What you have afterwards
A sequence with order, durations, sound and opening titles — rendered as an animatic or handed over to Murnau.
Step 9. Opening titles on top, timeline below.The timeline. Four clips, durations, audio tracks.
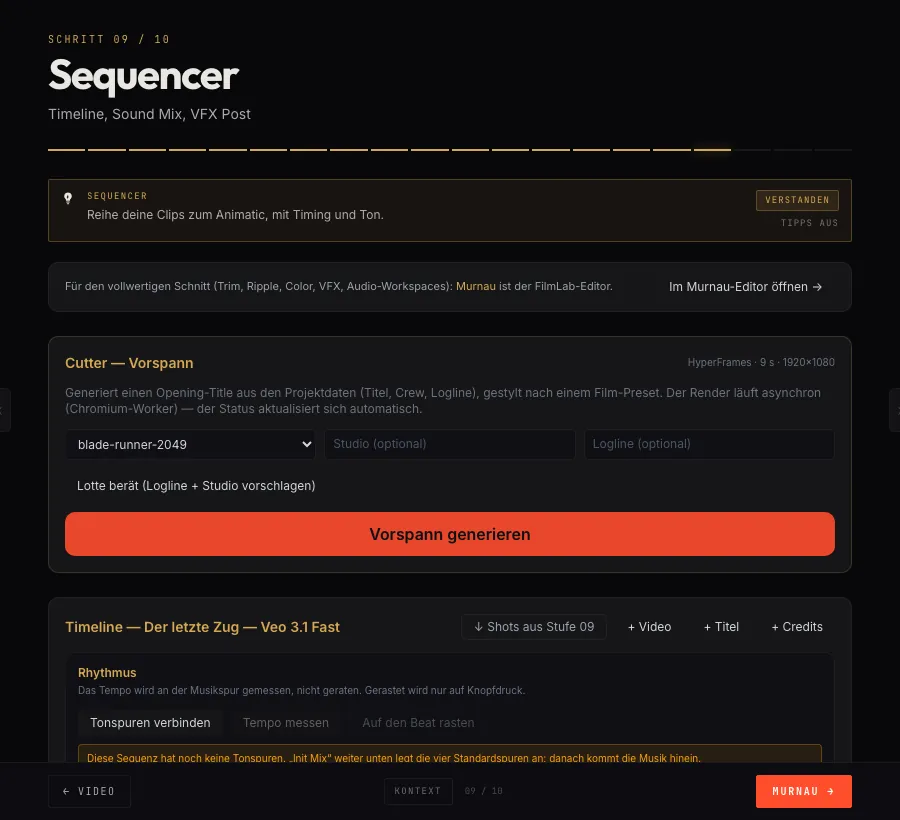
Create new sequence, then ↓ Shots from stage 09: the selected clips land as a row in the sequence (the number is the old count, step 8 is meant).
Every clip has a number field for the duration in seconds — Enter saves, Escape discards, a dot next to the field means “not saved yet”. Limits 0.3 to 60 s; the interface tells you when it clamps a value.
Init mix (in the audio tracks box) creates the four default tracks — dialogue, music, effects, atmosphere; Connect audio tracks binds the tracks created in step 8 to them. Without this binding the beat buttons are off, and the reason is stated in plain text below. Ducking ON/OFF lowers music under dialogue.
Cut to the beat:Measure tempo measures the music track (result: Measured: X bpm, plus a confidence bar with a threshold — if it lies to the left of it, the measurement was a suggestion, not a finding). Then Snap to the beat: the cut points move onto the beats, the beat ruler shows hits in green. ↺ Undo (n) restores the durations from before. Snaps only if the crew preset carries a snapping rhythm (on the beat, on the song structure, against the beat); frei and atmend do not snap — on purpose.
Generate opening titles builds title (5 s), end credits (8 s) and the AI labeling (4 s, pre-worded text under Art. 50 AI Act) as blocks. The block is a label, not a lock — what cannot be switched off sits deeper: every render with AI material carries the mark in the image and in the file, see Provenance.
Check continuity compares every shot with the previous one and with the character and location sheets — the drift of the same character from shot to shot is the real opponent, not a bad match cut. Show VFX Post lists rework.
Start render calculates the animatic on our machines. For the fine cut: Open in the Murnau editor →, see chapter 5.
Arrange, measure, snap, render: free · opening titles and continuity: low, shown in the cost line
Pixelate faces — in the rendered clip
In the Sequencer, in the VFX bar, the tile Pixelate faces. It works on the rendered sequence: render first, then pixelate. Through MCP the tool is called lab_vfx_preset; with dry_run it shows the price without starting.
Searching. SAM 3.1 (Meta, runs at fal.ai) finds the faces across the whole clip.
Tracking. FilmLab follows every face through the clip, closes short gaps of up to 12 frames and pixelates each face as an ellipse with a margin.
Verifying. A second face detector (YuNet) looks at every frame individually and pixelates what SAM missed.
The effect is selectable: Mosaic (default), Blur or black area. Resolution, frame rate and sound stay; ProRes stays ProRes. The tool treats masked faces, for example under a balaclava, like all others: it finds the visible part and pixelates it.
Exceptions. Individual people can be excluded, today through MCP, with a preview image per person. After that FilmLab recalculates, free of charge.
Checking. The run comes with a contact sheet of all places where frames were interpolated, the second detector added something, or a longer gap remained open. Look there first.
Pixelated automatically, not guaranteed to catch everything — check before publishing. No detector finds every face in every frame; whether the clip is clean is in the end decided by your eye, not the tool.
Credits per frame, shown on the button before the start · only the face search costs; rendering again (different effect, exceptions) is free · “No faces found” stays booked
A rendered sequence. For an export with generated people or voices: a human who approves.
What you have afterwards
A film file in the target profile, next to it the provenance record — and on request publication on FrameZero.
Step 10. Choose profile, quality, export.Finished exports. Each with its provenance record next to it.
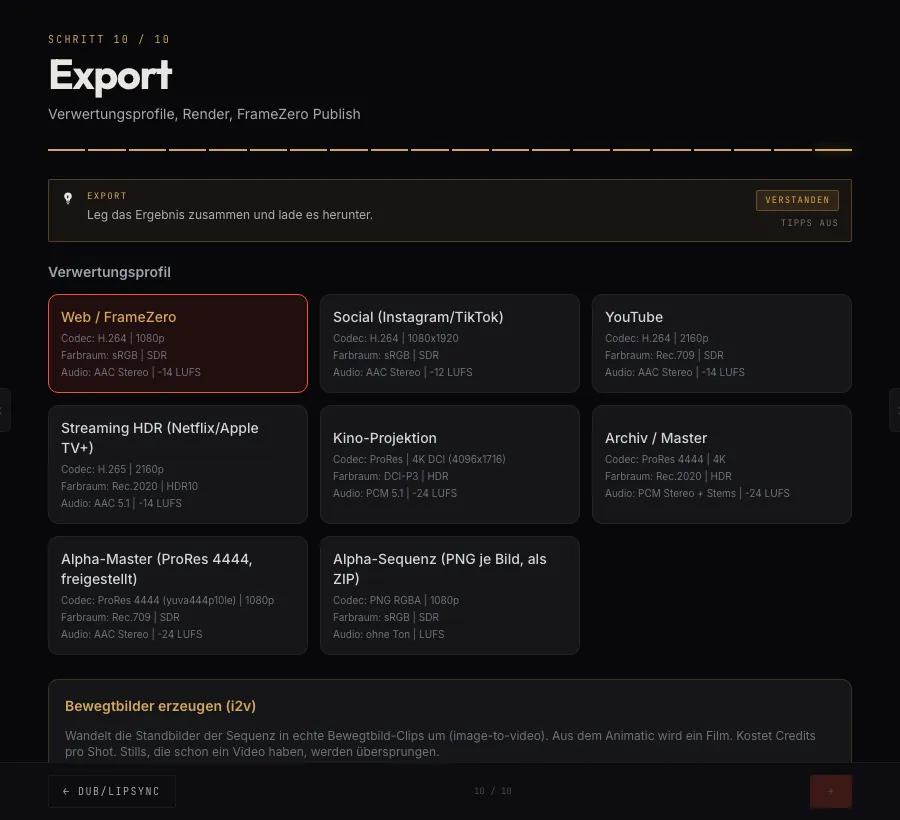
Choose a profile. A profile is a bundle of color space, codec, container, resolution and loudness — the figure most deliveries fail on:
Profile
Color space
Codec
Resolution
Loudness
Web / FrameZero
sRGB · SDR
H.264 / MP4
1080p
−14 LUFS
Social (Instagram/TikTok)
sRGB · SDR
H.264 / MP4
1080×1920
−12 LUFS
YouTube
Rec.709 · SDR
H.264 / MP4
2160p
−14 LUFS
Streaming HDR (Netflix/Apple TV+)
Rec.2020 · HDR10
H.265 / MP4
2160p
−14 LUFS
Cinema projection
DCI-P3 · HDR
ProRes / MOV
4K DCI
−24 LUFS
Archive / Master
Rec.2020 · HDR
ProRes 4444 / MOV
4K
−24 LUFS
Alpha master (ProRes 4444, cut out)
Result from “Layers” with transparency, 1080p — for compositing elsewhere
Alpha sequence (one PNG per frame, as ZIP)
the same as single frames
Quality: Draft (720p, fast), Standard (1080p) or High Quality (4K). The tier changes resolution and data rate, not the profile — color space and loudness stay where the target puts them.
If clips for images are still missing: Animate shots creates them here (paid, cost line).
Export. If the sequence contains a generated person or voice, the button reads Approve and export and first requires the sentence “I have viewed this export and approve it. It contains synthetically generated or altered people or voices.” Account, time and wording version are recorded. Only a signed-in human can approve — an agent gets a refusal here.
Download the finished file. Next to it sits the provenance record, see below. Publish film puts it on FrameZero, our own screening area.
Ten decibels lie between social and cinema. Anyone who uploads a cinema mix (−24 LUFS) to Instagram gets turned down quietly and sounds thin; anyone who delivers it the other way around fails approval. The same sequence, two files — that is why one export per target.
Export: no Credits — processing runs on our machines
The provenance record — what sits next to every file#
A broadcaster, a festival, a funding body will ask at some point: what in this film is AI, and who approved it? Every export produces a record as a PDF (to read) and JSON (for machines), with a link to a verification page. It sits next to the film file, not inside it.
After the export, download the record too and put it next to the film file. Inside: checksum and duration of the file, whether the labeling is in the image, approval with date, and per clip timecode, source, type (e.g. image to video), tool, provider, creation time. Not inside: prompts, consent IDs, email, account.
Verifying — also for third parties, without having to trust us: drag the film file onto seal.thefilmradar.com/herkunft. The browser calculates the checksum locally, nothing is uploaded. The record is signed and doubly timestamped, one of the stamps anchored in the Bitcoin blockchain; if you like, verify with OpenSSL, the instructions are on the page.
Every render with AI material carries the mark “AI-altered” at the bottom right and, in the file, the machine-readable note under IPTC — regardless of whether the labeling block is in the opening titles.
What the record does not prove: the timecodes apply to the export from FilmLab, not to the broadcast version — conform, grading and transcode lie in between. It is not a C2PA certificate with a chain to a verification authority, but a record of our own, openly documented. Where the system recorded nothing at generation, it says “not recorded”, no guessing. It is kept in a reduced version for ten years beyond the end of the contract.
The crew is ten departments — direction, camera, light, production design, costume, makeup, grip, edit, colorist, sound — with four to five parameters each. They have a say in every chat and every prompt. A preset sets all of them at once.
Open Crew in the bar. Choose a preset: Film presets are a specific film with its real crew (Blade Runner 2049, In the Mood for Love, Grand Budapest Hotel …); Trend presets are techniques from commercials for finished spots — for example gegenpunkt, bewusst-einfach (the cheapest), heimvideo-vhs, mehrbild, zeitraffer-fahrt, kontrolliertes-chaos, figuren-mosaik, surrealismus.
Apply preset. Change individual departments afterwards and Apply overrides.
Nineteen trend presets carry a guardian (for example surrealismus, gegenpunkt, mehrbild, kontrolliertes-chaos): they ask for a justification of why the story needs this technique. Without a justification the guardian counts as open — the crew's answer says so. Nothing is blocked, but anyone generating with it should close it first; the guardian for surrealismus is the warning about the oversaturation of surreal AI images.
A street with twenty people is what a video model spoils most reliably. That is why extras here are not made in the model but as a separate layer over the plate — figures as cards, spread out on the ground, rendered.
Open Layers (header: Layers — Layered Shot Builder). Choose a plate: a still or a video with camera movement.
Suggest layers has the crew propose foreground, cast and props as layers; Cut out cuts out an element. For extras, cut out an element of type crowd — that is a card: one figure in portrait format, with feet (4 Credits; if the feet are missing, it is re-rolled at our cost). In the section Extras click the card on the left and distribute — or turn it into a short clip (16 Credits, 6 s, standing or conversation; walking does not exist, because no model can do it).
With a moving plate: Track camera · free, 1–4 min. The verdict says trackable or not; a plate that cannot be tracked carries no scale. track again after a plate change.
Scale: mark the main figure (foot and top of head) and enter their height. Without it the calculation assumes eye level as camera height — with a low angle the crowd then comes out too small.
① Assemble renders (17–39 s for 12–30 figures); occlusion by people and objects in the plate happens by itself. ② Harmonize matches the light — the figures take on the color of the light, the brightness stays; default 60%, at 100% skin tones are recolored too. ③ Parallax export outputs the layers with depth.
If you cut out the main figure in Resolve more cleanly than the automatic tool, send the Magic Mask matte back through the bridge; it replaces the automatic person mask.
Harmonize: before · 50% · 80%. Plate and figures are AI-generated.Card 4 · clip 16 (Credits returned if nothing is produced) · tracking, masks, render: free
Open Dub/Lipsync, choose a sequence. Import brings in your own speech material.
Generate EN track translates and speaks the dialogue track in the target language. Clone voice · 125 Credits with MiniMax, 17 with Fish takes the voice from the existing material — speech material is available for the lipsync anyway.
Start dub / lipsync lays the lips onto the new track.
Dubbing always runs through Credits, even with your own key — the price is blended from several providers. And dubbed versions made via the short route do not get a provenance record yet.
A take of your own in landscape format, up to 15 s, with your voice and otherwise as little noise as possible. The consent of the person in the image — with yourself that is your own likeness. An image of the creature on your body: the rebuilt start image from the hybrid shoot or a sheet (see below).
What you have afterwards
The same take in which your head — or your whole body — has become the creature: camera, room, clothing and your voice stay, the face becomes a mask.
The template adopts the prompt templates from Mickmumpitz's “AI Performance Capture 2.2” (October 2026) — head swap, animal on four legs, humanoid creature, head and legs, one person out of several — and sends them to MiniMax H3 through the hybrid shoot. One difference from the original matters: there only the masked area is recalculated, at FilmLab H3 recalculates the whole frame and receives the fence only as text. What that means is in the measurement below.
In the Express start choose the tile Creature swap (group Previs & making-of). The project opens in the Hybrid shoot; the scaffold in the idea asks for take, creature, swap area, light and performance.
1 · Plate: Choose clip, set In and Out to 5 s for checking, Use clip · free. The first frame of the excerpt is grabbed.
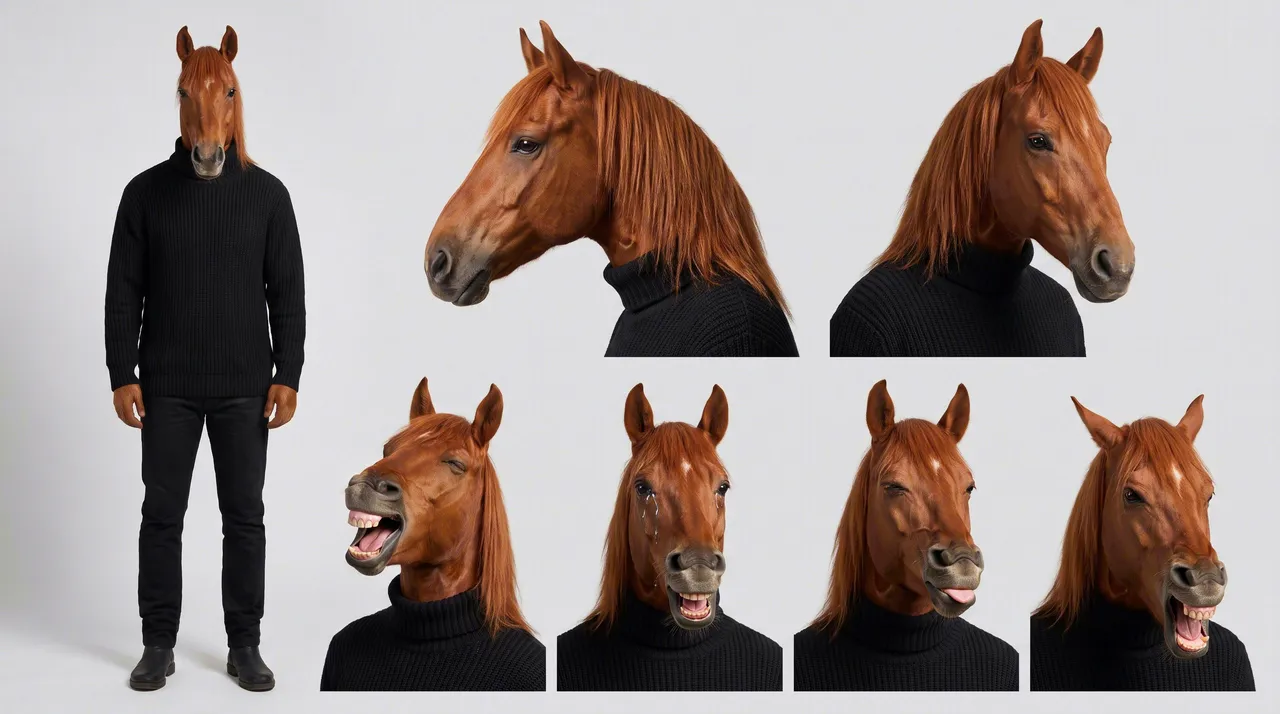
2 · Start image: rebuild the first image — write into the change what becomes different and what stays: “Replace the head with the head of a real horse growing out of the collar; body, sweater, room and light stay.”Rebuild start image (one image, paid). The rebuilt image is the reference for the video — the role the character sheet plays in Mickmumpitz's version. You create a sheet of your own with four expressions (prompt in the template) in the image stage, 13 Credits with Nano Banana Pro.
3 · Motion: Are there people in the frame? → Yes, then H3 · up to 15 s, 4K and the Resolution (768P for checking). The depth map stays off with H3.
4 · Video: the suggested prompt describes the rebuild; replace it with the head-swap template from the preset (IRO fills it in for you with creature, light and performance) — Restore suggestion brings the old one back. Never name the helmet, the phone or the rig in the prompt: what gets named, H3 paints. Read the cost line (H3 charges result plus clip seconds), then Generate video. Your voice is laid under the new image after the run.
Check the result in the contact sheet, only then order the full length. The video then also sits in step 8. In Resolve the same run goes through Restyle clip with the template Creature swap; IRO offers the five variants there — head, animal, humanoid creature, head and legs, one person out of several.
50 Credits per 5 s at 768P (5 s result + 5 s clip) · start image rebuild extra · justification required: the likeness of a real person is alteredThe creature sheet. One image from Nano Banana Pro following Mickmumpitz's sheet prompt: views plus four expressions, the creature in the clothing from the take.
Measured on October 7, 2026 — what H3 really holds without a mask
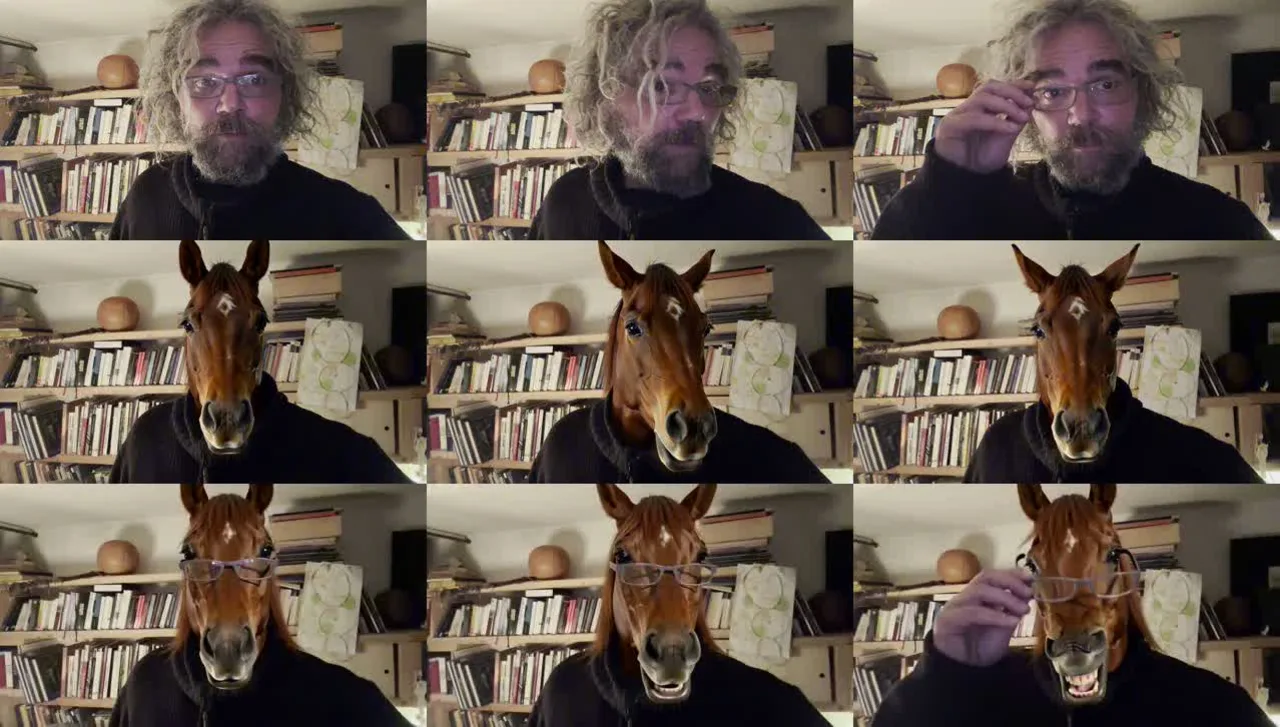
A take of your own (1280×720, 25 fps, 8.8 s, speaking), excerpt 0–5 s, head swap to a horse, twice: without a sheet and with a sheet as image reference. 50 Credits each.
On top the take, in the middle without a sheet, at the bottom with a sheet. Room, shelf and sweater stay in both runs. With the sheet the hand at the glasses also stays — and the horse gets the glasses from the take.
without sheet
with sheet
Room, camera, clothing
stay
stay
Head at the collar
sits like a mask
sits like a mask
Expression
only the lower jaw
Lower jaw, at the end a grin from the sheet; eyes, ears, nostrils rigid
Hand and glasses at the head
lost
kept, glasses move onto the horse
Time base
25 → 24 fps, 5.0 s becomes 5.17 s; the voice sits underneath, shifted back, and drifts by 0.17 s over 5 s
What the technique is at FilmLab — and what it is not. A mask gag that holds: wide shot, short clips, one punchline. Not performance capture for speaking close-ups — the facial expression does not follow the take, because at our end H3 has no second video slot for a face reference. Always supply the sheet: it does not bring the performance, but it tells the model that the take is the source for everything except the head.
If you have a graphics card with 24 GB, you will find Mickmumpitz's free workflow in the ComfyUI catalog (MiniMax H3 Performance Capture 2.2): there only the mask is calculated, camera and facial expression stay real.
Story axis — the scenes as an axis: ✎ sketch (storyboard sketch, 1 Credit), Change location, Illustrate scene → jumps to step 6.
Pose Director — posture and blocking of the figure before the prompt is made; Save & Continue to Prompt → (the button is labeled in English).
Capture — record or upload your own material, save to scene; 3D fast turns a photo into a 3D model (paid; edges fray on thin parts — wiper blade, gutter).
Murnau — Open Murnau or or open in a new tab →, see chapter 5.
IRO reads your project and tells you what comes next, what it costs and which look fits. IRO suggests — only what you click is executed. The conversation costs you nothing.
Click IRO in the bar at the top. The column opens on the right: at the top a dot bar with the scenes, below it IRO · Pipeline · <Step> — IRO knows which step you are in.
Type into the field Ask IRO — or say what should happen, Send. Below the empty field are suggestions for each step, such as What does a video cost?, always also What should I do next? and What can you do here?. They disappear as soon as you type.
Prefer to speak: the microphone (Speak instead of typing). The recording runs until you tap again (Recording 0:12 · tap to finish), is converted and lands editable in the field — nothing is sent by itself. The recording is not stored.
While IRO reads, it says IRO is looking things up …; the answer names what was looked up and how long it took.
What a suggestion is
IRO separates two kinds, and you see the difference on the button:
Without money — Take me there (to a step), Set location, Rewrite, To the location, Apply look (with a before / after preview). At most three per answer.
With money — exactly one image: Generate image · N Credits. The price is on the button, and it comes from the cost lookup, never from the model text. If it cannot ask for the price reliably, the button does not exist. If the balance is not enough, it reads Not enough balance and is off — it does not disappear.
If a question needs a department, IRO brings it in by name — one of the ten crew roles, at most two per answer. What does not exist, IRO says honestly (“that does not exist”) — tested with “Upscale video to 4K?”.
Right of the edit area are three surfaces — Edit, VFX, Sound — each with an input line, sliders and tool tabs. IRO is in each one, backed by a department: Edit (Tarek Mansouri, film editor), VFX (Anders Marder, cinematography), Sound (Rafael Duarte, composer and sound designer). Operation in chapter 5.
She can take it back — the retraction lands as a correction next to the source, not as a deletion, and carries your name; what you correct, nobody else sees. In the app there is no button for this yet; the way is the MCP tool lab_widerruf (chapter 6).
The in-house edit bay, in the browser: timeline, two monitors, color, VFX, sound, Deliver. The clips from the Composer land in it directly, without a detour through a download folder.
From the Composer: in the Sequencer Open in the Murnau editor → or in the Murnau tool Open Murnau. The handover creates a session and imports the clips (status line: Loading Composer media…, then N clips imported from Composer).
Back goes through ← FILMLAB at the top left.
Fetching material afterwards: in the Media Pool (tab MEDIA) at the bottom ◉ Composer → dialog Import from Composer project → choose the project → All or individually → Import selection. Your own files: + Import. This needs a session (+ New session in the header).
Load audio clips fetches the project's generated audio tracks.
Anyone opening a Composer project must be its owner or a Studio member — until September 28 any account could open any project handed over; that is closed.
Click a clip in the Media Pool → it sits in the Source Monitor. Set start and end with I and O (Set start (I), Set end (O)).
Into the timeline: ↓ Insinserts and pushes — what follows moves by the full duration, a clip over the insertion point is split. ↓ Ovr overwrites, the length stays. Or drag the clip from the pool onto the track.
Tools above the timeline: ✂ (blade — split clip), ↖ (selection), + V / + A (add track), zoom −+Fit. Snapping is always on (five frames), there is no switch.
R switches Ripple Mode: a trim at the right edge pushes the following clips along.
◆ Cues shows the cue track (at the bottom).
Key
Effect
Space
Play / pause
JKL
in the Source Monitor: slower / pause / faster · on the timeline: one frame
←→
one frame back / forward
IO
Set start / end
Del / ⌫
Delete clip
R
Ripple on/off
+− · Shift+Z
Zoom · show the whole track
Shift+I
Edit Index (the edit list as a table)
Ctrl/⌘+Z · Ctrl/⌘+Shift+Z
Undo · Redo
Esc
Cancel, close overlay
The Edit Index (button INDEX or Shift+I) shows the edit list: Track, Src In, Src Out, TL In, Dur, Source, Shot — in timecode, video tracks only.
Saving happens by itself, one and a half seconds after every change. The line in the header says so: not saved → saving… → saved · 14:03:12. Every save writes the edit to where an agent reads through MCP — human and agent see the same state.
Versions in the header opens the dialog. Save version → What should the version be called? — a named version. At most 50 (N of at most 50); every row has restore.
Below it the EDIT HISTORY: every automatic version with its author (You or Agent), per row what changed? and keep, to turn it into a named version. Restoring works from the named versions; from the history only through keep.
In the same dialog: USAGE 30 DAYS — N Credits · N runs, where the balance went, the three most expensive per stage first.
When the save line asks a question. If the project holds several sequences and it is unclear which is meant, Murnau does not write back but asks: … — Edit NOT applied: which sequence? ▸. If a save overwrites an agent's work, the line says what is gone (3 clip(s) of the agent overwritten …, checkpoint created) — the state before it sits in the history.
The cue track — holding the prompt against the edit#
A cue is a single statement from the prompt (“hard cut at 00:01.50, camera on the hero, medium”), tied to a window in the edit. The track answers the question: did what the prompt says happen in the image?
Cues are created in the Composer (step 8, Read from prompt) or in Murnau: switch on ◆ Cues, the track is called CUES (n), next to it § n for rules that apply to the whole clip; ↻ reads again.
Set one finding per cue — you, after looking: da (it is in the image like that), fehlt (does not occur), anders (something happens, but not that), offen (nobody has looked yet).
The tally names what is open first: 12 open · 31 there · 6 missing · 2 different (79%). If · 2 outside this cut follows, two cues of the source clip lie outside the trimmed window.
You cure fehlt with emphasis, anders never. With the first, the instruction was missed — clearer, earlier, repeated. With the second, it was understood and reinterpreted — only rewriting helps there. Anyone who lumps both together tries the wrong remedy until they consider the model useless.
Choose the surface on the right. Edit: field Say what should happen — “cut to the beat”, “remove pauses”, or just ask → Send. VFX:Describe VFX action … “remove wire, extend sky, add rain” → Apply. Sound: field (labeled in English) → Apply. Under each empty field suggestions — Cut to the beat, J-cut on all dialogue, Remove wire rig, Dialogue louder against the music …
IRO answers (IRO is checking…, then Checked: …) with a suggestion of one or more steps. Do it (n) runs them, Discard rejects. Below it says: Nothing has happened yet. Before writing, the server creates a checkpoint.
The sliders under each surface are instructions to IRO, not effects. Only deviations from the default travel along; if all are at default, IRO gets “decide based on the material”.
Surface · Slider
Area · Default
high means
low means
Edit · Pace
0–200 · 100
tighten, remove dead time, cut earlier
leave air, let pauses stand
Edit · Tension
0–100 · 50
cut on the movement, shorten toward the end
exhale, let it run out
Edit · Rhythm
0–100 · 50
even lengths, on the beat
deliberately uneven, long against short
Edit · Flow
0–100 · 75
soft transitions, J and L cuts
hard cuts, let the breaks stand
VFX · Intensity
0–100 · 100
play out fully
hinted
VFX · Blend
0–100 · 100
blended in — grain, color, light matched
visibly applied
VFX · Detail
0–100 · 50
hair and edges clean — slower, more expensive
rough
VFX · Edge
0–100 · 75
hard, precise edge
soft — right for motion blur and hair
Sound · Loudness
−24…0 · −14
louder toward 0 — social
quieter — cinema and archive (LUFS, a standard, not taste)
Sound · Dynamics
0–100 · 50
keep quiet and loud apart
compress, evenly loud
Sound · Clarity
0–100 · 60
speech to the front, noise to the back
leave the room unembellished
Sound · Depth
0–100 · 40
allow reverb and depth
dry and close
The tool tabs under the sliders (Transitions, Smart Cut, Tracker, Roto, EQ, Compressor, Reverb, Denoise, Ducking …) are partly still grayed out — what is gray does not exist yet. In Murnau there is no price on IRO's buttons; what IRO runs, runs on our machines.
In the bar Edit | Color | VFX | Audio | Deliver go to Color. Two levels: Intent (describe) and Control (wheels and sliders).
Intent:Film Looks — 18 cards in three groups (Cinematic: Natural, Warm Cinema, Cold Steel, Teal & Orange, Bleach Bypass, Film Noir · Film Stock: Kodak 5219, Kodak 2383, Fuji 3510, Ektachrome, Vision3 500T, AGFA 200T · Era & Genre: 70s Grindhouse, 80s Neon, 90s Indie, Sci-Fi Cold, Horror Desaturated, Documentary). Or Describe your look… → Apply; sliders Intensity, Warmth, Contrast, Saturation, Shadows. Reset takes everything back.
Control: Lift / Gamma / Gain / Offset with R/G/B/Y, modes Primary / Log / HDR; Exposure, Temperature, Contrast, Saturation, Hue, Mid Detail, Color Boost, Shadow, Highlight, Tint; curves, qualifiers, power windows; scopes Wave / Vector / Histo / Parade. Split shows before/after, Gallery the stills.
The 70 looks from the Composer (20 original, 50 after film frames) are not these 18 cards — they sit in the Composer's grade companion (step 6) and in the MCP tool lab_grade. If you want a reference look on a clip, apply it to the clip in the Composer (button Look in step 8) and then bring it to Murnau.
⬇ Deliver in the header or the tab Deliver. On the right choose a profile:
Profile
for what
Web (H.264 · 1080p)
MP4 for Vimeo/YouTube
Social 9:16 (1080×1920)
Reels/TikTok/Stories
Social 16:9 (1920×1080)
IG Feed/FB
HDR streaming (HEVC 2160p)
Netflix/Apple
Cinema (ProRes 422 HQ)
Master for color/sound
Master (ProRes 4444)
Archive/Delivery
Start rendering. If the sequence contains generated people or voices, a dialog asks: Approval needed — N clip(s) with person, N voice(s), with the wording, and OK = approve and render. Canceling means: Approval canceled — no render started.
If it says ⛔ Export blocked — EU AI Act Art. 50, a consent is missing → 🛡 Manage consent.
The job appears in the render list (queued → encoding N % → done). Pro, Pro BYOK and Studio get priority in this queue: a job behaves as if it had been submitted ten minutes earlier, without a Creator job ever waiting more than ten minutes longer. There is no sign for it; you notice it in the order.
Done: ⬇ Download, ▶ Preview, Again. Plus ✓ Check page — the publicly verifiable provenance record (Script Seal); it appears up to a minute after the render. PDF and JSON of the record are not offered here as a button; the check page leads there.
The loudness meter ◉ LOUDNESS (broadcast −23 / web −16 LUFS) shows the mix; the target values of the profiles are in step 10. For alpha exports, HDR metadata and the cinema and archive profiles with a loudness standard, the export in the Composer is the more complete way.
What Murnau does not have, although it is built: a button for OpenTimelineIO. A sequence can be output as OTIO and brought back in (the way back always creates a new sequence) — today only through the interface layer, not through the surface. The exchange in the surface is Load .ffreel / Export .ffreel, its own format.
The same pipeline, operated by an AI agent — Claude at the desk, Claude Code in the terminal. 83 tools, every paid one with the price before the run. Reading is free; generating costs the same Credits as in the app.
Address: https://mcp-lab.thefilmradar.com/mcp. No API key, no copying tokens: the connection runs over OAuth with your FilmRadar account. The agent never sees your password; in the connector settings you can revoke access at any time.
claude.ai and Claude Desktop
Settings → Connectors → Add custom connector.
Paste the URL: https://mcp-lab.thefilmradar.com/mcp.
Sign in with your FilmRadar account in the login window.
Claude Code
claude mcp add --transport http filmlab https://mcp-lab.thefilmradar.com/mcp
After that, in the session: /mcp → filmlab → Authenticate.
No account yet? Create one at lab.thefilmradar.com, then connect. You get Credits for generating in the Composer (Pricing).
Every paid tool takes get_cost: true. The same call with this switch creates no job and charges nothing — it answers with the price in Credits and euros and your balance afterwards (balance_now).
The agent shows you the price. Only after your yes does it call the same tool without the switch — with the same inputs.
Through the bridge facade, the second step is additionally tied to an approval token: the price answer carries a field freigabe that is valid for exactly this call with exactly these inputs, once and for fifteen minutes. An agent that changes the inputs needs a new one.
What an agent may not do: approve an export with generated people or voices — only a signed-in human can do that in the interface. And it cannot upload anything: MCP has no upload tool; your own reference photos go in through the Composer.
lab_propose (a suggestion with a price, as in the app) · lab_run_proposal · lab_widerruf (correct a wrong answer)
Tool responses with images render in Claude as a widget: gallery, videos inline, detail view with the full prompt and parameters; the review buttons on every card write your verdict back to the lab.
lab_create_project with title and preset → lab_run_module script, then analyse.
lab_generate with get_cost: true → show the price → again without the switch, with character_refs and location_id, so that figure and location go along as references.
lab_animate with the source_image_id of the accepted image; model from lab_list_models (mind the input roles: Seedance 2.5 accepts no faces).
lab_job_status at intervals until done; lab_review_asset sets selected.
B · Cut to the beat
lab_generate_music — write the tempo into the prompt (“118 bpm, steady four-four time”), lab_list_audio until done.
lab_bind_audio binds the track to the music track of the sequence.
lab_beatgrid measures; watch confidence and verlaesslich — below the threshold it is a suggestion.
lab_suggest_durations shows what the snapping would do; lab_apply_rhythm writes. Snaps only with presets whose rhythm snaps. Complete in Findings and in the recipe Cut to the beat.
C · Reference motion with Seedance 2.5 (reshoot, location as template)
Shot without a figure (room, prop, atmosphere): lab_reference_motion without reference_video_url, with tool: seedance_2_5 and referenzen: [{art: ort, url}], plus resolution, aspect_ratio. 480p for viewing (92 Credits per 5 s clip), 720p for delivery (197 Credits per 5 s clip).
Reshoot from new angles: reference_video_url = the wide shot, use_depth: false (depth pins the geometry); ton stays quelle, the template's sound sits underneath. Only without people in the master.
Shot with a figure: still via lab_generate, then lab_animate with a model that accepts faces.
Sound effects per shot: lab_ton_durchlauf, first with get_cost, then with hinweis (location in one line).
The reference path never falls back to another model. If the provider declines (face in the image, content filter), the run ends with the Credits returned to your balance — not in a silent switch to a model you did not choose.
Resolve, After Effects and Blender get their FilmLab connection from one installer. It puts the files in the right place and creates your personal bridge key — no terminal, no Git, no Python.
Download: macOS · ZIP (macOS 11 or later, Apple Silicon and Intel) or Windows · EXE. macOS: right-click → Open. Windows: at the SmartScreen warning More info → Run anyway (the build is unsigned).
In the window ◉ FILMLAB INSTALLER: choose Install and tick the targets — DaVinci Resolve and After Effects are preselected, Blender (add-on) is not: if you want Blender, tick the box yourself.
Enter FilmLab password (or a ready flbk_ key) and user email. The installer signs in once, creates a bridge key and stores it; the password is not stored. On the Mac the key additionally lands in the keychain — Fetch bridge key from Keychain (macOS) takes it from there next time. Optionally a project ID, so the bridge works in a project right away.
Run. At the end it says Installation complete. Config OK.
The key then sits in ~/.filmlab/resolve.env (Windows: %USERPROFILE%\.filmlab\), readable only by you. Resolve from the Mac App Store is detected and supported too — the sandboxed version has its own paths, the installer writes to both.
For Blender, the installer alone is not enough. The add-on ends up in the extensions folder, but has to be enabled in Blender: Edit → Preferences → Add-ons, search for “FilmLab”, tick the box. And: if no Blender 4.2 or later is present, the installer sets up nothing for Blender — the message about it is covered by Installation complete. Anyone who cannot find the tab in Blender should check these two things first.
Too many bridge keys?Too many active bridge keys on the account — revoke one first. means: revoke an old key in the account, then try again.
Updating: the same installer, or in the Resolve bridge the button ⬆ Install update to vX.Y.Z as soon as it appears. Uninstalling: choose Uninstall, optionally Also delete configuration.
Four connections, one principle: the image you are working on goes through the pipeline, the result comes back to where you are. Where the price is shown before the click and where it is not, is stated with each one.
Resolve Studio (the free version does not expose the scripting API), an open project with a timeline, the installer from above.
What you have afterwards
Generated takes in the Media Pool or directly on the timeline, with recipe and before/after; on request Magic Mask mattes as an extras mask in FilmLab.
In Resolve: Workspace → Scripts → Utility → FilmLab. The panel opens in its own window (Window position, Always on top); if the window is missing, in the browser. If nothing happens at all on click: read ~/.filmlab/bruecke-start.log — and for App Store Resolve in the container below it, ~/Library/Containers/com.blackmagic-design.DaVinciResolveAppStore/Data/.filmlab/.
1 Source:Frame grabs the image under the playhead, Clip In–Out the range between In and Out, thought only works without an image. The rows below show clip, length and grabbed resolution.
2 Job: under What should happen choose a card — Remove (Remove logo), Replace & Generate (Replace object, Generate image, Insert element, Move object), In motion (from an image, from an image, with sound, between two images, from a clip), Light & Look (Set light, Film look, Rebuild clip), Voice & Sound (Speak text, Generate music, Generate sound effect, Generate ambience), Body & Space (Photo to 3D). Under Settings come the named rows: Model, Duration, Resolution, Direction, Voice …; Take over the clip's camera move carries the movement of the reference along. The Thought is the prompt, Dreamer fleshes it out.
Price before the click: above the button it says costs with the number — 12 cr, from 6 cr, 6–12 cr or free. Generate ⌘⏎ only becomes clickable once there is a confirmed price; otherwise it says below what is missing (No price yet — first choose source and tool.).
3 Result: every take sits as a tile in the contact sheet; the inspector shows each one's recipe and Before / Wipe / After. Results go into the Media Pool; with automatically to the timeline (under Account) to the end of the open timeline — beforehand the bridge creates a checkpoint (a duplicate of the timeline). Take as edit fetches a whole FilmLab sequence.
Masks: Brush and Mask from description (the latter paid) for tools that need one.
Magic Mask as an extras mask
On the Fusion page create a MagicMask tool and click the figure — a human makes the click; points set by script do not produce a single frame.
Through an agent (chapter 6, facade): resolve_magicmask_tracken, then resolve_magicmask_lesen at intervals until fertig, resolve_magicmask_exportieren, resolve_magicmask_nach_filmlab. From then on the extras render in FilmLab takes the matte as the person mask of this video.
Three limits from day one: tracking only runs with the Fusion page open and the tool in the viewer; the “Render completed” dialog halts Resolve until someone clicks it away; a call has a twenty-second limit. Remove logo (Delogo) uses Bria Video Eraser: place a box around the whole logo, mark In/Out. The price is 12 Credits per measured second; only the softly faded mask is inserted into the original.
The facade: an agent sees FilmLab and Resolve at the same time
The bridge runs a local server; the MCP server filmlab_bruecke_mcp.py (found under ~/.filmlab/bridge/ after the installer) talks to it and to FilmLab:
claude mcp add filmlab-bruecke -- python3 ~/.filmlab/bridge/filmlab_bruecke_mcp.py
First call of every session: bruecke_status — names port, host (Resolve or Blender), version, response time. Then resolve_projekt_lesen. Twelve read tools (timeline, clips with index, markers, Media Pool, node graph, render state …) and three that write (track Magic Mask, export matte, resolve_ergebnis_an_timeline) — every writing tool creates a checkpoint first. Individual clips are addressed through the index from resolve_timeline_clips, never by name. A back door for arbitrary code in Resolve does not exist and never will.
Blender 4.2 or later, the add-on from the installer (tick the box yourself), enabled once in Blender.
What you have afterwards
A Blender camera is a FilmLab shot: images and clips are made from the camera view and sit behind the camera.
Enable: Edit → Preferences → Add-ons, search for “FilmLab”, tick the box.
In the 3D viewport N → tab FilmLab. If it says Not signed in / Bridge key missing (~/.filmlab/resolve.env), run the installer or use Sign in in the FilmLab window.
Make the camera active → Bind camera to shot. Afterwards it says <Camera> → Shot xxxxxxxx with Frames from–to. To bind an object to a figure: object active → Bind object to figure; later Change or Unbind.
The bar: Bar in the tab or Shift+Alt+Space. It sits at the bottom of the viewport with two tabs: IMAGE (chip New (t2i) or Look (i2i), plus the resolution tier) and VIDEO (tool and duration, menu Choose video tool). Type into the field Describe what should be made ….
Price before the click: the line N cr · M left (in the accent color when the balance is low, ? cr as long as there is no price). Then GENERATE. After the run the calculated price is shown with it.
The result sits as a background image behind the camera that triggered it — visible only in the camera view, not in the render, without sound (Clip sits behind the camera · camera view only · no sound). Blender has no timeline for it.
Hand to the crew puts a question to the FilmLab crew of the connected project; Open FilmLab window brings up the full bridge interface.
Phone camera: the iPhone controls the Blender camera
What you need
The Kadrage app on the iPhone, the Blender add-on with a bridge key and a camera in the scene.
What you have afterwards
A handheld camera movement: live in Blender, recorded as keyframes. The iPhone sends only position and rotation, no images.
In Blender, in the tab FilmLab, click Pair phone. The browser opens a page with a QR code. The code is created in the browser; the pairing token sits in the address part after the # and reaches no server.
iPhone: Kadrage, module Blender, scan the QR code. It says Connected to Blender. Without a camera scan: in Blender Copy link, on the iPhone Paste link from clipboard. The browser can also be opened again with Show QR.
Hold the iPhone in landscape and move it: the bound camera follows live.
You operate Record and Stop in Blender. The movement then sits as keyframes in the scene from the current frame. A recording holds at most 3,000 poses or 300 seconds; beyond that it aborts with a message instead of silently cutting off.
Disconnect ends the session; the iPhone shows Session ended. Otherwise it expires after 15 minutes.
What goes over the network: poses run through a small Cloudflare relay (handy.thefilmradar.com) that the add-on queries. The Blender bridge stays on 127.0.0.1. The relay stores no user data and logs no poses. The recording in Blender enters the existing path as quelle: "blender-kamera"; a paid run remains a separate approval with the price beforehand.
Two bridges at the same time are the normal case — Resolve and Blender register separately (bruecke.json, bruecke-blender.json). An agent through the facade takes Resolve first; if the tool list is empty, it is attached to Blender. Anyone who means Blender sets FILMLAB_BRUECKE_PORT to the Blender bridge or closes Resolve.
The MCP page talks about three tabs “Image, Video and Look”. There are two; Look is a chip in the IMAGE tab.
After Effects 22 or later, Python 3 on the system, the installer from above.
What you have afterwards
A clip from the current comp frame, imported into the project panel.
File → Scripts → FilmLab_Bridge.jsx. The dialog ◉ FILMLAB BRIDGE opens — a modal window, not a dockable panel.
Choose Tool (eight video tools), Prompt, Duration (s), optionally Scene ref (default from the comp name). Tick Show costs.
Animate frame. The current comp frame goes through the pipeline; the finished clip is imported into the project panel (FilmLab: Video imported → '…'. Drag it onto the timeline to use it.).
Two things that are different from Resolve: the price appears here only after the run in the line Cost: …, not before — anyone who wants to know the price beforehand asks in the Composer or through an agent with get_cost. And After Effects freezes during the run, for up to ten minutes; ExtendScript knows no concurrency. Do not kill it.
The Drop from the repository (it is not in the installer), Python 3, two folders.
What you have afterwards
From every frame in the input folder a finished clip in the output folder — in Avid, on request, automatically into the bin.
Start in the terminal: python3 integrations/fcp-avid/filmlab_drop.py. The window ◉ FILMLAB DROP names the folders Input (frames from the NLE) = ~/FilmLab/Eingang and Output (finished clips) = ~/FilmLab/Ausgang. Set Tool, Prompt, Duration (s), Start watch.
Final Cut:Share → Save Current Frame into the input folder. Import finished clips from the output folder.
Avid:File → Output → Export As… → Graphic into the input folder. Set up the output folder as a Dynamic Media Folder (Tools → Dynamic Media Folders, profile with a target bin) — then every clip lands in the bin by itself.
Processed frames move to Eingang/verarbeitet, failed ones to Eingang/fehlgeschlagen. Accepted: png, jpg, tif.
Every frame in the input folder starts a paid generation — it also says so in the Drop's log. The Drop shows a price nowhere; if you want to know it, ask in the Composer beforehand. There is no panel inside Final Cut or Avid.
The bridge is attached to Blender, not to Resolve.
Open the Resolve panel or set FILMLAB_BRUECKE_PORT.
Bridge: a tool is missing even though it is new
Resolve is running with old bridge code.
Restart Resolve — a second click on the menu entry does not load new code.
Bridge: DaVinci Resolve Free does not expose the scripting API
Resolve without Studio.
Studio is a prerequisite.
Magic Mask tracks 0 frames
Fusion page not open or tool not in the viewer; or a stale point after “Clear Strokes”.
Open the Fusion page, put the tool in the viewer, click the figure again.
Blender: no FilmLab tab
Add-on not enabled, or no Blender 4.2 or later found (the message was covered).
Edit → Preferences → Add-ons → “FilmLab” → tick; otherwise update Blender and run the installer again.
Installer: Too many active bridge keys on the account
Maximum number reached.
Revoke an old key in the account.
After Effects does not respond for minutes
The run blocks AE — for up to ten minutes.
Wait. Do not quit.
Own key: error instead of a run
Key invalid, account empty or throttled — there is no silent fallback to Credits.
Check with the provider; or run the job through Credits on purpose.
If that does not help: [email protected] — with the project ID (shown in the dialog Projects) and, if it is about a run, the job number from the cost line or from lab_get_job.
Prices in euros, including tax, queried from the live system on 2026-09-28. Generation is billed through Credits — or through your own key at the provider.
Plan
Price / month
Credits
Includes
Free
0 €
50 / month
For trying out: full planning for one project (idea, screenplay, analysis, storyboard, shot list) and 50 Credits a month that do not roll over.
Creator
19,99 €
500
Unlimited projects, export without watermark, funding export profiles.
Pro BYOK
29,00 €
0
The platform; generation runs through your own keys (chapter 1). Models without your own key through Credit packs.
Pro
49,00 €
1500
Plus the full tiers of the video models (Veo 3.1 Standard, Kling 3 Pro, Seedance 2.5, HappyHorse, Wan VACE), Pose Director and Coherence Sync.
Studio
149,00 €
6000
Everything from Pro with four times the Credits, own keys without a second subscription, three seats for the team (chapter 1).
Change plan or buy packs: click the balance at the top right → Choose → on the plan, Manage sub → for the current subscription. The balance also applies in Murnau: one subscription, one account.
What a Credit is in euros depends on how you buy: between 2.5 cents (Studio) and 4.0 cents (Creator or the smallest top-up pack). That is why every cost line names both. Purchased balance does not expire, the one from the subscription does (Terms § 7: Credits are valid for three months).
Priority. Pro, Pro BYOK and Studio get priority in our own queue — render, tracking, masks, depth, animatic, lipsync, dubbing. At the model provider there is no priority; image and video generation waits there in its order.
Why the cost model looks the way it does — the test day for $45 where $7.50 would have been enough, the factor of six between models — is in the Findings.